
The Late-Night Baking Dilemma: No Baking Soda? No Problem!
It happens to the best of us. You get that sudden, undeniable craving for something warm and sweet at nine in the evening. You pull out the flour, sugar, and butter. You chop up a bar of dark chocolate, anticipating the glorious melt. Then, you open the pantry and stare into the abyss. You are completely out of baking soda. Panic sets in, but let me tell you a little secret. You can still make the most incredible batch of cookies.
A chocolate chip cookie recipe without baking soda is entirely possible.
I remember the first time I faced this exact scenario. My mixing bowl was already filled with creamed butter and brown sugar, and a trip to the grocery store was absolutely out of the question. I decided to just bake them anyway. The results absolutely blew my mind. I expected flat, unappealing discs of sadness. Instead, I pulled out a tray of pure magic.
The Science of the Spread: Why Skipping the Leavener is Actually a Game Changer
Baking soda typically acts as a leavening agent. It reacts with acidic ingredients to create tiny bubbles of carbon dioxide, which gives your baked goods a little lift. When you remove it from the equation, the cookies do not rise as much. They spread out differently. This alters the entire texture profile of the dough in the best possible way.
The lack of aeration means the dough stays incredibly compacted.
As the butter melts in the hot oven, the edges still manage to get beautifully crispy. The center, however, remains stubbornly thick and rich. Because there is no baking soda to neutralize the acidity of the brown sugar, the flavor notes become noticeably deeper. You get a stronger hit of molasses and butterscotch with every single bite.
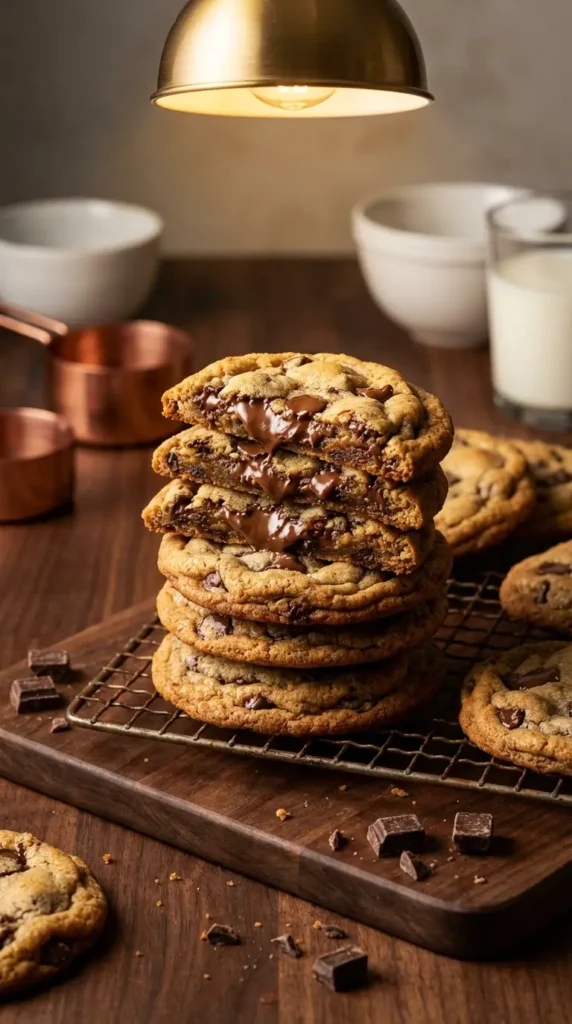
Chewier, Denser, Fudgier: What Happens When You Ditch the Baking Soda
If you love cakey cookies, this might not be your jam. But if you are a fan of ultra-dense, bakery-style treats that practically bend in half when you pick them up, you are going to fall in love. Leaving out the leavener creates a texture that borders on a brownie or blondie. The center stays gloriously underbaked and gooey.
It is a texture lover’s absolute dream.
Every pocket of melted chocolate feels more prominent against the fudgy dough. The entire cookie is weighty and deeply satisfying. This chocolate chip cookie recipe without baking soda has become my go-to late-night fix. Honestly, it is so good that I often make it on purpose now. Let us dive into exactly how these wonderful treats come together.
Ingredients

The Pantry-Raid Lineup: What You’ll Need (And Foolproof Substitutions)
Making a chocolate chip cookie recipe without baking soda requires leaning heavily on the basics. You likely have every single one of these items sitting in your kitchen right now. The beauty of this recipe lies in its sheer simplicity and lack of fussy components. It is baking at its most straightforward.
The Wet Mix: Why Cold, Aerated Butter is Your Built-In Leavener
Because we lack chemical leaveners, we have to rely heavily on mechanical aeration to give our dough some structure. We do this by vigorously creaming cold butter with sugar. The sharp edges of the sugar crystals cut tiny pockets of air into the dense fat. This simple step provides just enough lift to keep the cookies from turning into complete bricks.
The Secret Thickeners: How Cornstarch and Flour Ratios Save the Day
Without a chemical leavener, cookies naturally want to spread out rapidly and become thin puddles on your baking sheet. We counteract this inevitable spread by slightly increasing the ratio of all-purpose flour to absorb more moisture. We also add a touch of cornstarch. This magical ingredient binds the liquids and guarantees an incredibly soft, tender crumb. It mimics a professional bakery treat perfectly.
The Star of the Show: Choosing the Right Chocolate to Flourish
This dense dough absolutely needs a bold counterpart. High-quality semi-sweet chocolate balances the deep molasses notes of the brown sugar perfectly. I highly recommend using a mix of chips and roughly chopped bars. This strategy creates varied pools of melty goodness in every single bite.
Equipment
You do not need an entire commercial kitchen to pull this off. A few reliable tools will set you up for success right at home.
- Stand mixer or electric hand mixer
- Large mixing bowl
- Silicone spatula
- Light-colored metal baking sheet
- Parchment paper or silicone baking mat
- Cookie scoop (2 tablespoon size)
- Wire cooling rack
Instructions
Step 1: Phase 1: Whipping Up the Magic (The Crucial Aeration Process)
This is where the real alchemy happens. Because we are skipping the chemical leaveners entirely, we have to create our own lift. We do this by aggressively beating air into the fat and sugar. Start by placing your cold, cubed butter into the bowl of your stand mixer along with both the dark brown and granulated sugars. Turn the mixer to medium speed and let it work for a solid three to four minutes. You want to watch the mixture closely.
It will slowly transform from a crumbly mess into a pale, creamy paste.
Once it looks fluffy and smells like sweet toffee, you are ready to move on. Scrape down the sides and bottom of the bowl with a silicone spatula to make sure no unmixed butter is hiding. Add your room temperature egg and vanilla extract. Beat the mixture for another sixty seconds until it looks completely smooth and emulsified.
- Cube the butter straight from the fridge to keep the friction from melting it too fast.
- Beat the butter and sugars on medium speed for 3 to 4 minutes.
- Add the egg and vanilla, mixing just until combined.

Step 2: Phase 2: Folding Wet and Dry (The Secret to a Tender, Playdough-Like Crumb)
Now it is time to build the structure of our cookie. In a separate medium bowl, whisk together the all-purpose flour, cornstarch, and kosher salt. Whisking ensures the salt and cornstarch distribute evenly throughout the flour so you do not end up with an unpleasantly salty bite. Pour the dry ingredients directly into your whipped wet mixture. Turn your mixer to the absolute lowest setting.
The goal here is gentleness.
Mix only until you see a few scattered streaks of white flour remaining. Overmixing will develop the gluten and give you a tough cookie instead of a tender one. Stop the mixer and dump in your semi-sweet chocolate chips or chunks. Use your spatula to fold the chocolate in by hand, mixing until the dough feels like soft, slightly sticky playdough.
- Whisk the dry ingredients together thoroughly.
- Add the dry mixture to the wet mixture and blend on low speed.
- Stop mixing while a few flour streaks remain.
- Fold in the chocolate chips manually.