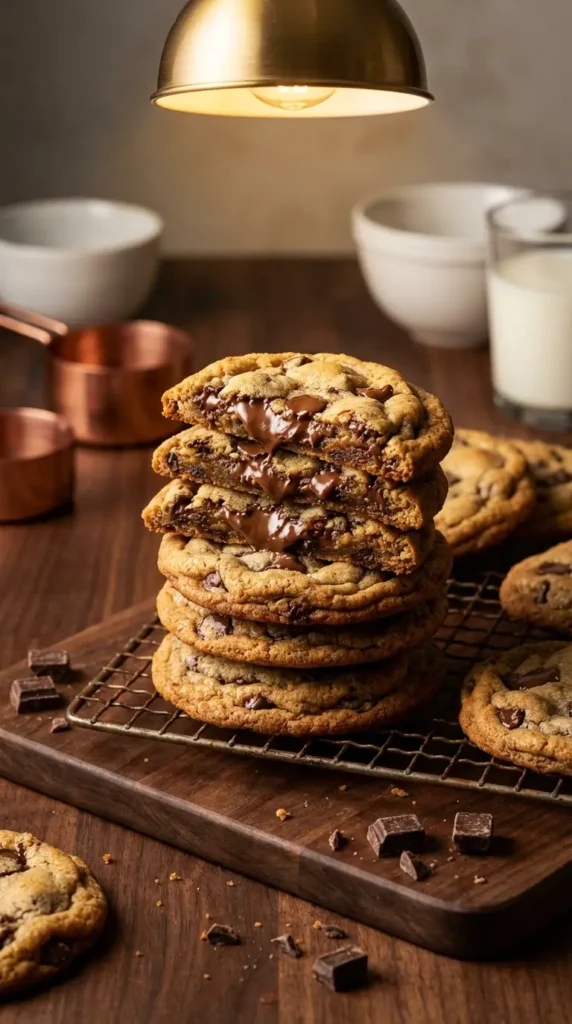

The Ultimate Retro Revival: Why You’ll Obsess Over This Cake
Some desserts never really go out of style. This Pineapple Upside Down Cake Recipe is the perfect example of vintage perfection. You get a caramelized fruit topping layered seamlessly over a dense buttery vanilla crumb. Every bite melts in your mouth. I remember my grandmother baking these in cast iron skillets on Sunday afternoons. The smell of melting brown sugar and baking pineapple used to drift down the hallway and wake me up from my afternoon nap. You just cannot beat that kind of nostalgia.
A Nod to the 1920s: The Fascinating History Behind the Classic
Did you know this dessert has been stealing hearts for over a century? Back in the 1920s, canned pineapple suddenly became wildly accessible across the country. Home bakers started placing those sunny yellow rings at the bottom of their pans with a generous handful of brown sugar. The inverted baking technique was actually a brilliant way to keep cakes moist before modern ovens had reliable temperature controls. It is a genuine piece of American culinary history. Baking it today feels like stepping right into a time machine. Plus it looks incredibly impressive without requiring any fancy frosting skills.
The Secret to a Flawless, No-Stick Caramel Flip
Let us talk about the flip. I know it can be terrifying to invert a freshly baked cake and pray the topping does not stick to the pan. I have ruined my fair share of desserts by waiting too long or rushing the process. The real trick is timing. You need to let the cake rest for exactly ten minutes after pulling it out of the oven. This brief pause allows the juices to settle and the bubbling caramel to firm up just enough to release cleanly. Run a butter knife around the edge. Place your serving platter on top. Take a deep breath and quickly flip it over. The moment you lift that pan and see those glistening cherries nestled inside golden pineapple rings is pure magic.
Ingredients

The Star of the Show: What You’ll Need for the Gooey Topping
The bottom of your pan is about to become the most glorious part of this dessert. A proper Pineapple Upside Down Cake Recipe relies entirely on getting this caramel layer right. You want the perfect ratio of butter to brown sugar so it bubbles up and encases the fruit. We are melting the butter directly into the pan to save time. Then we pack in the brown sugar to create a rich foundation. I highly recommend using light brown sugar instead of dark brown sugar so the caramel does not overpower the delicate fruit flavors.
For the Ultimate Tender Crumb: Your Cake Batter Essentials
A beautifully caramelized top needs a sturdy but tender cake underneath it. We are using a classic creaming method here. Beating softened butter and sugar together creates tiny air pockets that give the cake a beautiful lift. Make sure your eggs are at room temperature before you begin. Cold eggs will shock the warm butter and cause your batter to curdle. That curdling can lead to a dense and heavy cake.
We are also swapping out traditional milk for the leftover pineapple juice. This simple trick infuses every single bite with bright tropical flavor.
The Great Debate: Why Canned Pineapple Actually Works Best Here
You might be tempted to buy a fresh pineapple for this recipe. Put it down. Canned pineapple is truly the undisputed champion of the upside down cake. Fresh pineapple contains an enzyme called bromelain. This pesky enzyme actually breaks down proteins and can turn your gorgeous cake batter into a soggy mess. The canning process destroys bromelain completely. Canned rings are also uniformly sliced and perfectly softened. They will sit perfectly flat in your pan and yield a stunning geometric pattern every single time.
Equipment
You do not need a professional pastry kitchen to make this vintage classic. A few standard tools will get the job done beautifully.
Instructions
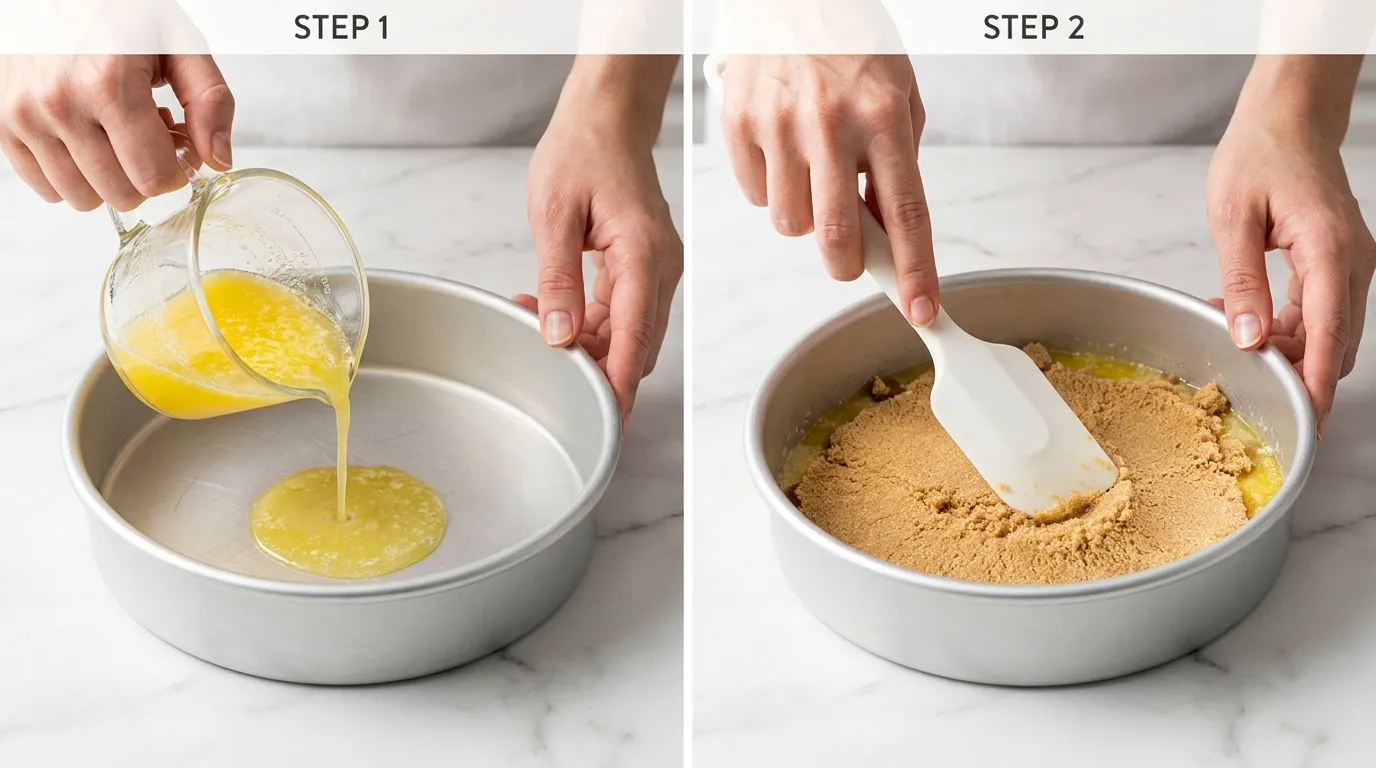
Step 1: Brown the Butter for the Ultimate Caramel Base
Every incredible Pineapple Upside Down Cake Recipe begins with the perfect caramel layer. This is going to be the shiny glaze that forms the top of your cake once inverted. You are going to start by taking your freshly melted butter and pouring it directly into your 9-inch round pan. Swirl it around gently so it coats the entire bottom evenly. Next comes the brown sugar. Sprinkle the packed light brown sugar evenly over the melted butter. You want to use your fingers or a silicone spatula to pat it down until it looks like wet sand. Taking the time to press it firmly into an even layer ensures your final caramel topping will not have any bare or patchy spots.
- Preheat your oven to 350 degrees Fahrenheit.
- Pour 1/4 cup of melted unsalted butter into the bottom of an ungreased 9-inch round cake pan.
- Sprinkle 3/4 cup of packed light brown sugar evenly over the butter.
- Pat the sugar mixture down firmly with a spatula until smooth.
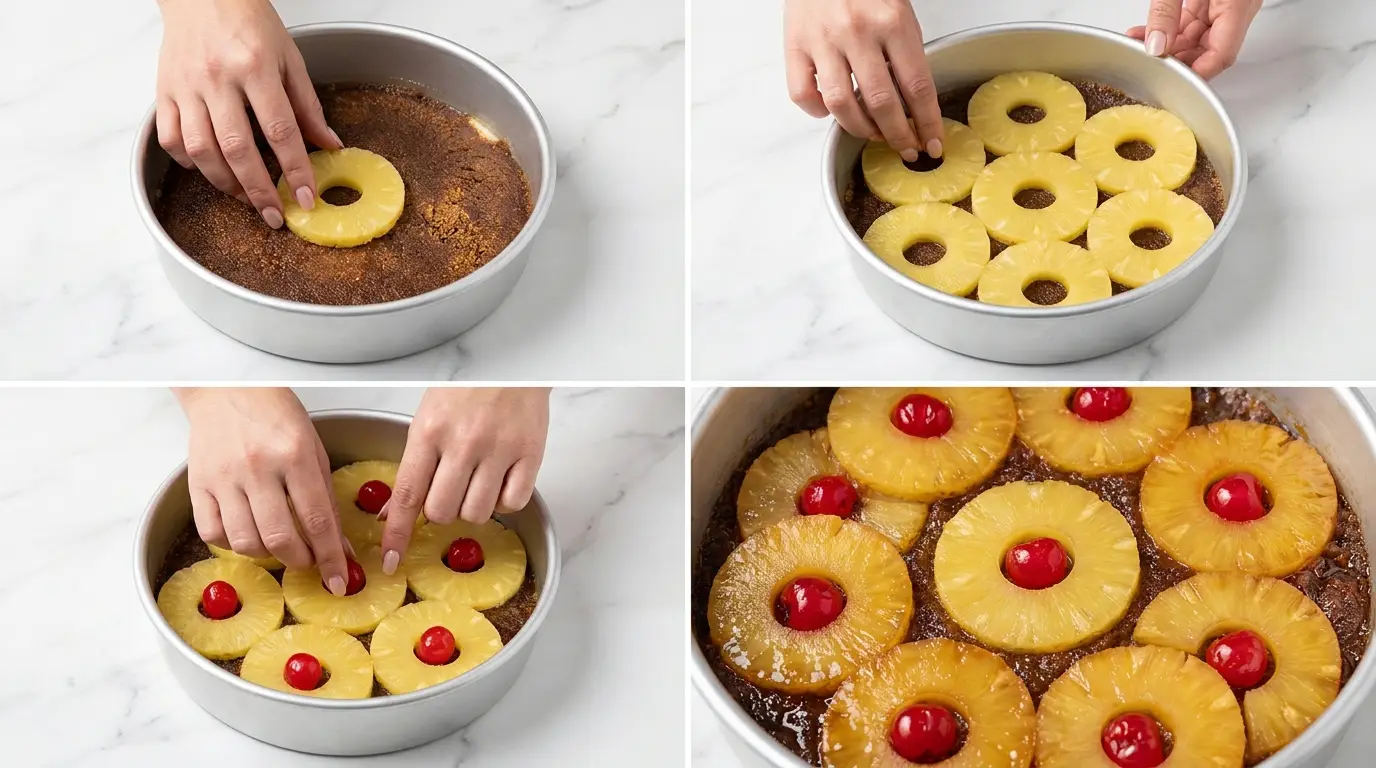
Step 2: Arrange Your Pineapple & Cherry Mosaic
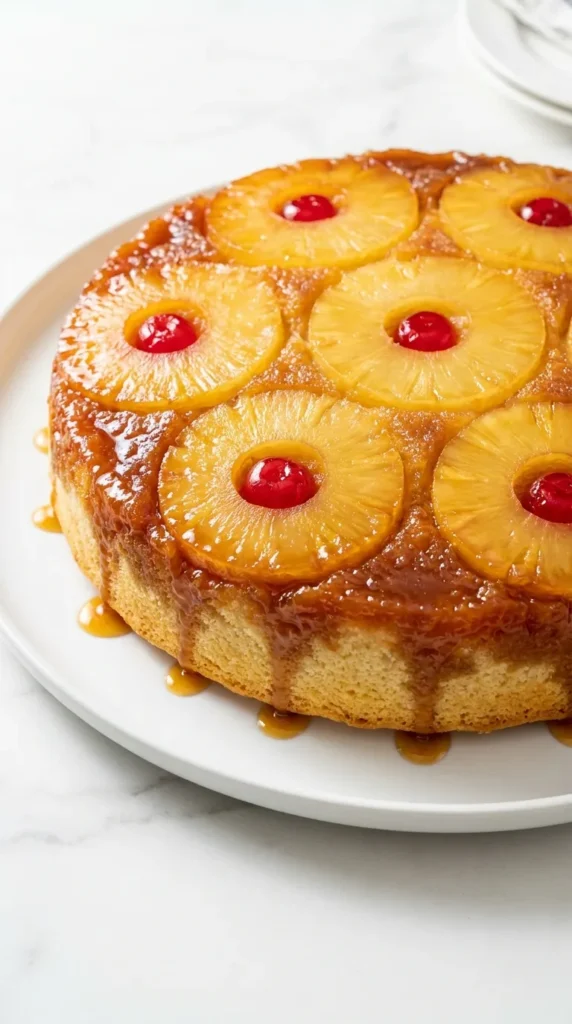
This is where the magic really starts to take shape. You are building the iconic vintage face of your dessert. Start by placing one perfect pineapple ring right dead in the center of the pan. Then carefully arrange the remaining rings around the center piece. They should fit snugly together like pieces of a delicious tropical puzzle. Once your rings are secured in the brown sugar bed, take your bright red maraschino cherries and pop one into the center of every pineapple ring. Use the leftover cherries to fill in any empty gaps between the pineapple slices around the outer edge. This creates that stunning geometric jewel box effect when you eventually flip the pan.
- Drain the canned pineapple rings, making sure to save the leftover juice for the batter.
- Place one pineapple ring squarely in the center of the pan over the brown sugar layer.
- Arrange the remaining 6 to 7 rings in a tight circle around the center ring.
- Press one maraschino cherry (stem removed) into the hole of each pineapple ring.
- Place additional cherries in the empty spaces between the rings.
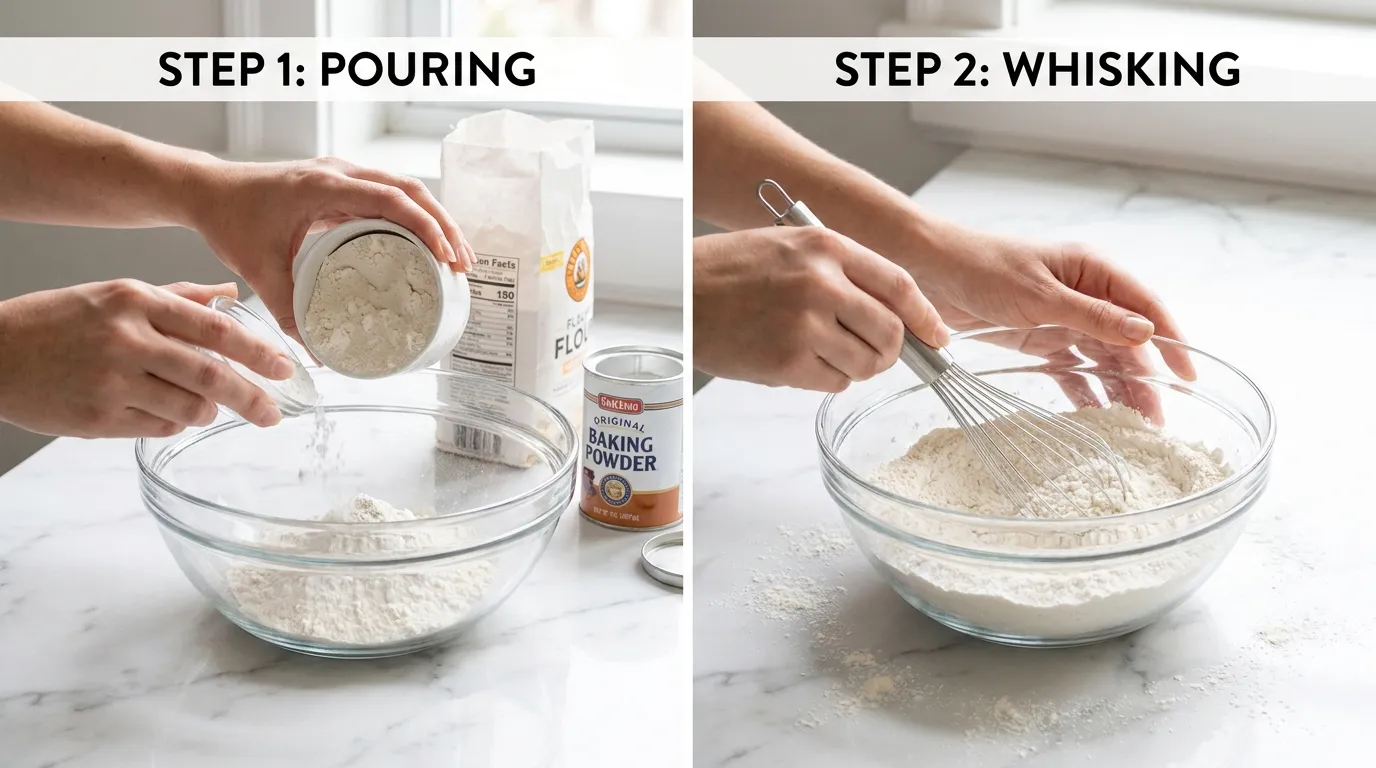
Step 3: Whisk the Dry Ingredients for a Cloud-Like Crumb
Now that our topping is resting securely in the pan, it is time to turn our attention to the cake crumb. A dense fruit topping needs a fluffy and tender foundation. Grab a medium mixing bowl and combine your dry ingredients. Whisking them together thoroughly is a small but critical step. It distributes the baking powder evenly throughout the flour. If you skip this, you might end up with large unmixed pockets of baking powder that cause the cake to rise unevenly and taste bitter. Spend a solid thirty seconds whisking until the mixture is light and completely uniform.
- In a medium mixing bowl, measure out 1 1/2 cups of all-purpose flour.
- Add 1 1/2 teaspoons of baking powder and 1/4 teaspoon of salt.
- Whisk everything together vigorously for at least 30 seconds.
- Set the bowl of dry ingredients aside.
Step 4: Combine the Wet Ingredients (Don’t Forget the Reserved Juice!)
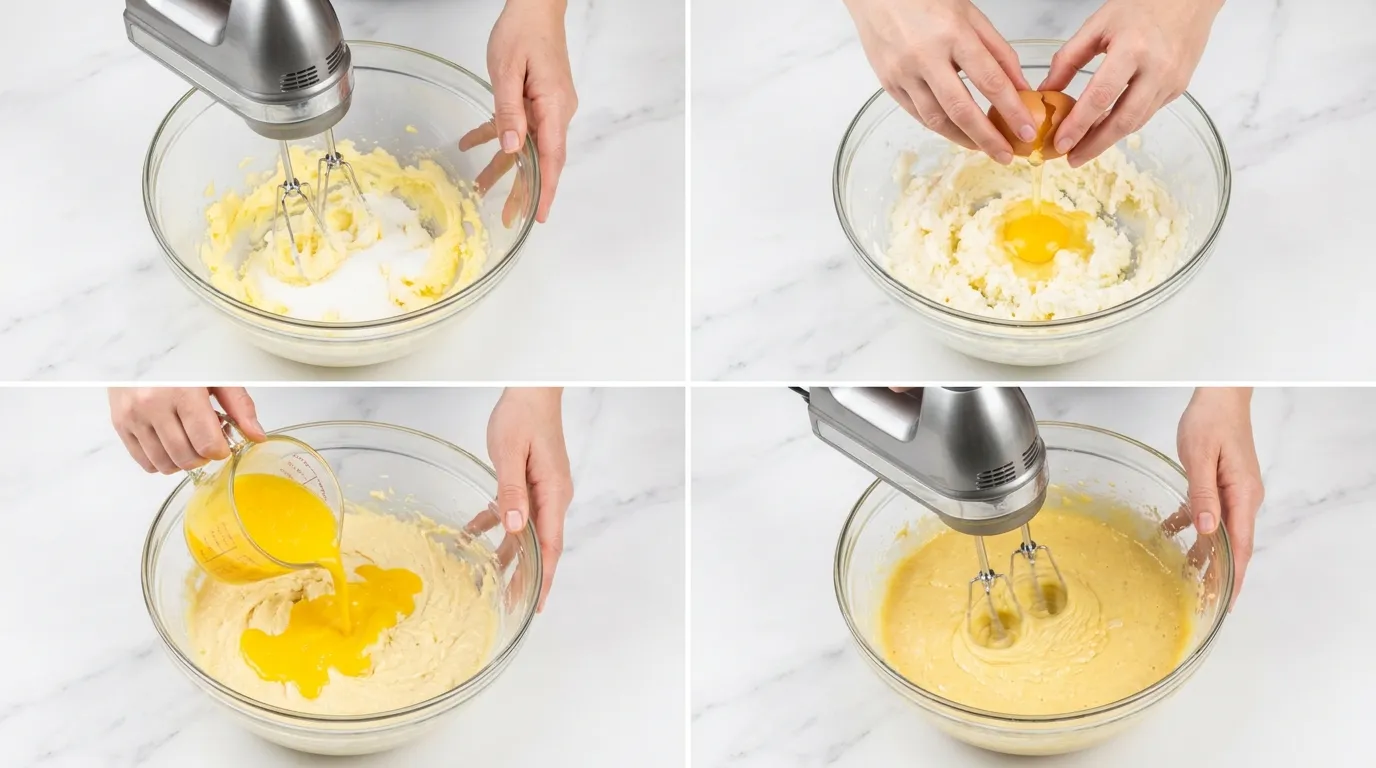
We are going to use the classic creaming method to build maximum fluffiness into our batter. In a large bowl, beat your softened butter and granulated sugar together until the mixture turns noticeably pale and smells sweet. This should take a few minutes. You are literally punching tiny air bubbles into the fat. Next, drop in your room temperature eggs one at a time. Beating well after each addition gives the batter time to emulsify smoothly. Finally, splash in your vanilla extract and pour in that reserved pineapple juice. The batter might suddenly look a bit curdled or split when the acidic juice hits the fat. Do not panic at all. This is totally normal and will smooth out perfectly once we add the flour.
- In a large bowl, cream 1/2 cup of softened unsalted butter and 3/4 cup of granulated sugar on medium-high speed for 2 to 3 minutes until light and fluffy.
- Beat in 2 large room temperature eggs, one at a time, mixing well after each addition.
- Add 1 teaspoon of vanilla extract.
- Pour in 1/2 cup of the reserved pineapple juice from the can and mix briefly on low speed.
Step 5: Fold the Batter and Spread Evenly Over the Fruit Layer
We are in the home stretch of the mixing process. Pour your sifted dry ingredients into the bowl with your wet ingredients. Switch from your electric mixer to a silicone spatula right now. You want to gently fold the flour into the wet batter by hand. Overmixing at this stage develops too much gluten, which will turn your delicate sponge into a rubbery brick. Stop folding the absolute second you no longer see any dry white streaks of flour. Once mixed, dollop the thick batter gently over your arranged pineapple rings. Spread it out cautiously using the back of a spoon. You do not want to press too hard and disturb your beautiful mosaic underneath.
Step 6: Bake Until Golden, Bubbly, and Set in the Center
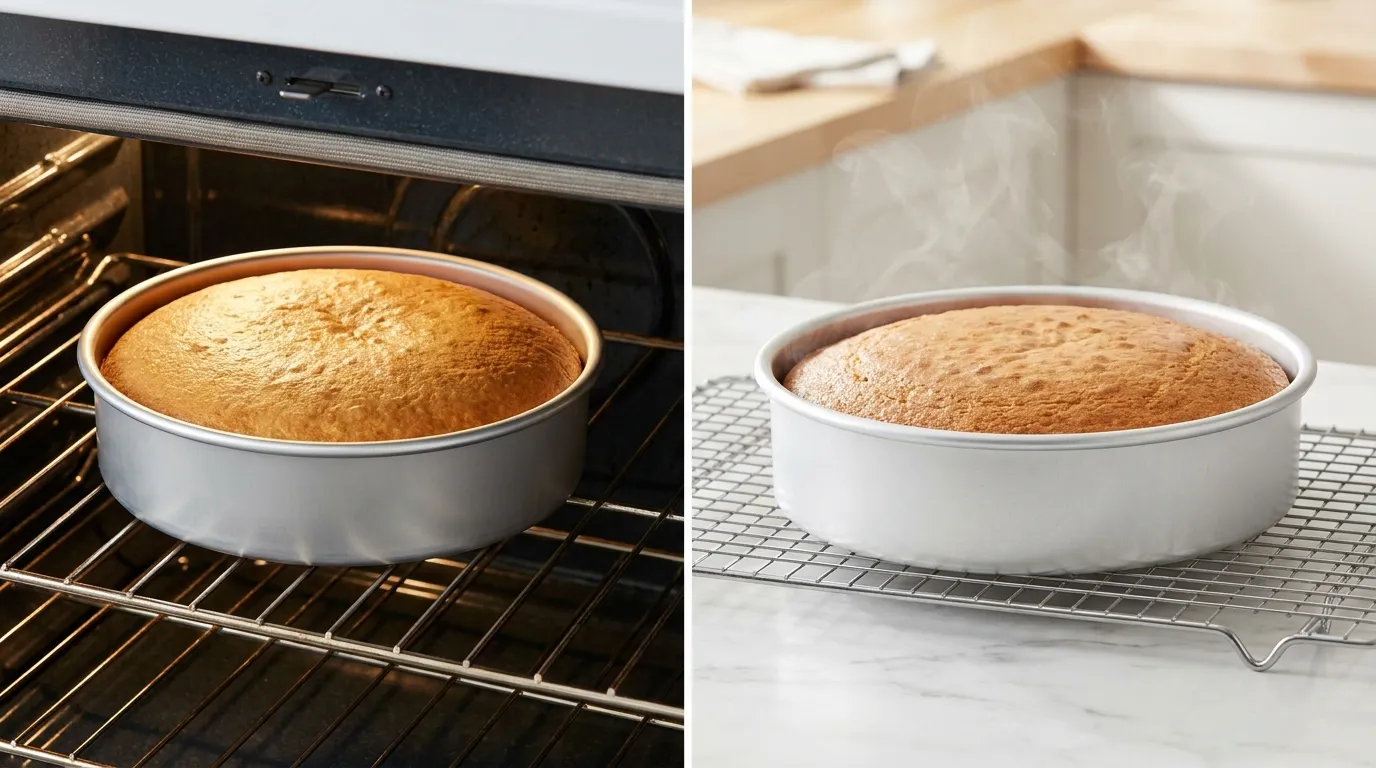
Slide the cake pan onto the middle rack of your preheated oven. Now comes the hard part. Waiting. As it bakes, the brown sugar and butter will melt into a bubbling, rich caramel that seeps up the sides of the cake. Your kitchen is going to smell incredibly fragrant and sweet. Bake it until the center is entirely set and the top has turned a gorgeous golden brown. You can gently press the center of the cake with your finger. If it bounces back lightly, it is ready to come out. Let it sit in the pan on a wire cooling rack for exactly ten minutes. No more and no less. This brief resting period is crucial for the caramel to thicken up slightly without hardening into concrete.
- Bake in the preheated 350-degree oven for 40 to 45 minutes.
- Insert a toothpick into the center of the cake to test for doneness. It should come out clean or with a few moist crumbs.
- Remove the pan from the oven and place it on a wire cooling rack.
- Set a timer and let the cake rest undisturbed for exactly 10 minutes.
Step 7: The Moment of Truth (How to Execute the Perfect Flip)
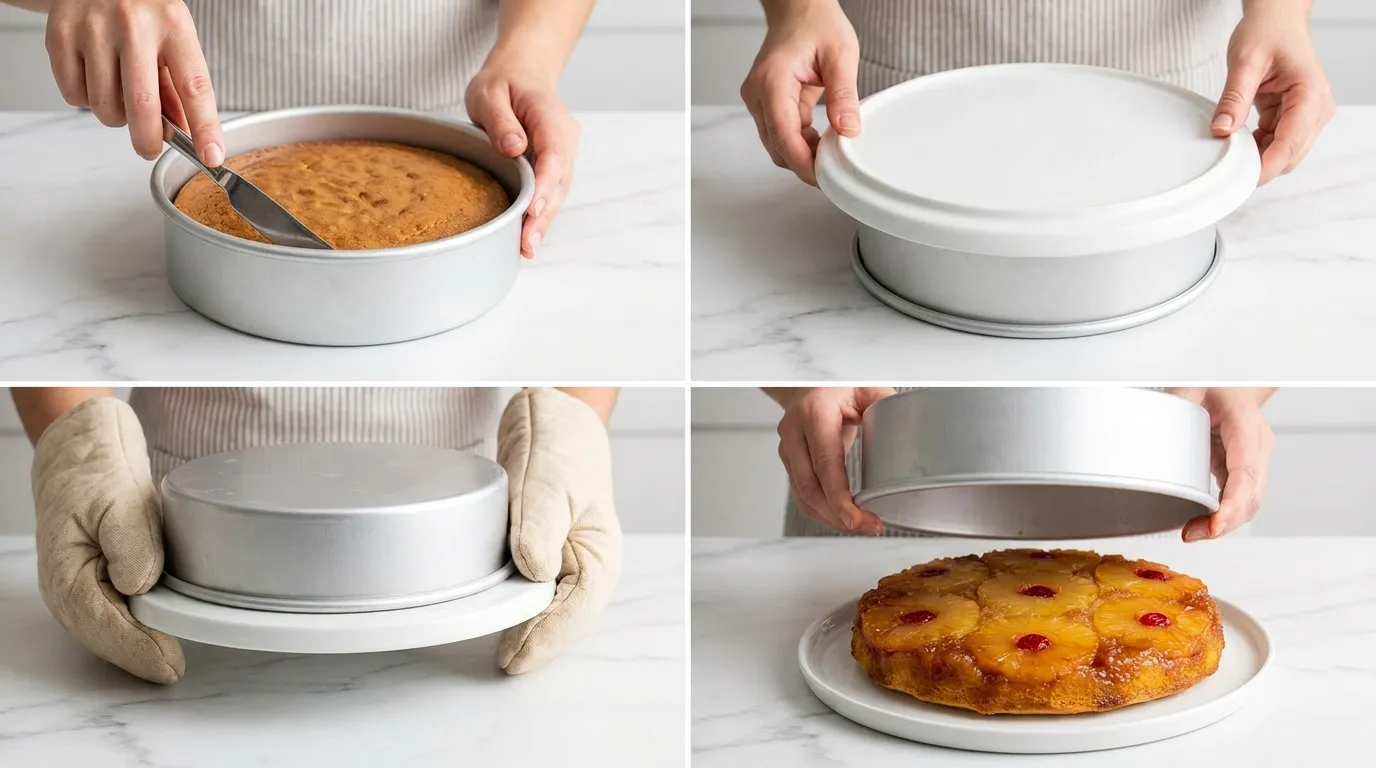
The ten-minute timer just went off. It is time for the flip. Take a deep breath. First, run a smooth butter knife or thin offset spatula around the very outer edge of the pan to loosen any sticky bits of cake from the sides. Next, choose a serving platter that is slightly larger than your pan. Place the platter upside down directly on top of the cake pan. Using two sturdy oven mitts, hold the platter and pan tightly together. Swiftly and confidently invert them together. Place the platter down on the counter. Give the bottom of the cake pan a firm tap with your hand. Slowly lift the pan straight up and away. The glistening, caramel-coated fruit will be shining right back at you.
- Run a butter knife around the edge of the slightly cooled cake to loosen it.
- Place a large, flat serving plate upside down over the top of the cake pan.
- Hold the pan and plate tightly together and flip them over in one quick motion.
- Gently lift the cake pan straight up to reveal the caramelized topping.
Pro-Tips: How to Keep the Cake Center from Getting Soggy
A soggy center is the number one complaint novice bakers have when attempting a Pineapple Upside Down Cake Recipe. The culprit is almost always excess moisture from the canned fruit. Pineapples act like little sponges holding onto all that sweet juice. Always blot your fruit dry with paper towels before laying them in the pan. Furthermore, resist the urge to pour any extra juice directly into the brown sugar layer. The fruit releases enough liquid as it bakes. By keeping your caramel base properly balanced, your cake will turn out perfectly tender instead of overly wet and heavy.
The’No-Fail’Rescue Guide: What to Do If Fruit Sticks to the Pan
We have all been there. You lift the pan with bated breath, only to realize one stubbornly stuck pineapple ring or a solitary cherry got left behind in the tin. Do not panic and definitely do not scrap the dessert. The fix is incredibly simple. Grab a small spatula or a fork and gently pry the stuck fruit out of the pan immediately while the sugar is still warm. Carefully place it right back onto the missing spot on the cake. The residual heat and sticky caramel will act like glue. Once the cake fully cools, no one will ever know it wasn’t a completely flawless flip.
Can I Make This Ahead of Time? (Storage & Freezing Secrets)
This classic cake tastes phenomenal on the first day when the edges are slightly crispy, but it actually stays remarkably moist for days. If you have leftovers, tent the cake loosely with plastic wrap or store slices in an airtight container. It will keep beautifully at room temperature for up to two days. If you need it to last longer, transfer it to the refrigerator where it will stay fresh for up to five days. To serve it cold or at room temperature is a matter of preference, but a quick ten-second zap in the microwave revives that fresh-from-the-oven magic perfectly.
You can absolutely freeze this cake as well. Wrap individual slices tightly in a layer of plastic wrap followed by a layer of aluminum foil. They freeze well for up to two months. Simply let the slices thaw overnight in the refrigerator before enjoying.
Next-Level Serving Suggestions to Impress Your Guests
While this dessert stands proudly on its own, adding a little garnish elevates it from a casual family treat to a stunning dinner party finale. Serve each warm slice with a generous scoop of premium vanilla bean ice cream. The cold, creamy vanilla melting into the warm, gooey pineapple caramel is an unbeatable texture contrast. If ice cream feels too heavy, a dollop of freshly whipped cream infused with a splash of rum or coconut extract works wonders. For a final tropical flourish, sprinkle lightly toasted shredded coconut flakes over the top right before serving.
Nutritional Information
Amount per serving (1 slice, assumes 8 slices total)
Frequently Asked Questions
Can I use a 9×13 inch baking pan instead of a round pan?
Yes, you absolutely can. However, you will need to double the recipe ingredients to properly fill a 9×13 inch pan. The baking time will also increase slightly, so start checking for doneness around the 45 to 50-minute mark.
Why did my cake sink right in the middle?
A sunken center usually points to two common culprits. Either the cake was underbaked, or your baking powder was expired. Always test the center with a toothpick to ensure it comes out clean before removing the pan from the oven. If your baking powder is older than six months, replace it for the best lift.
Can I use crushed pineapple instead of sliced rings?
You can use crushed pineapple if you prefer the texture. Drain the crushed pineapple thoroughly in a fine mesh sieve to remove as much liquid as possible before spreading it over the brown sugar. Just keep in mind that you will lose the classic vintage geometric look.
Do I need to refrigerate the leftovers?
Refrigeration is not strictly required if you plan to eat the cake within two days. Covering it tightly at room temperature is perfectly fine. For longer storage up to five days, keep it in the refrigerator to maintain ultimate freshness.
Pineapple Upside Down Cake
AUTHOR: True Taste Buds
A classic vintage dessert featuring a caramelized pineapple and cherry topping over a dense, buttery vanilla cake. This 1920s nostalgia piece is made with an easy inverted baking technique.
20 MINS
45 MINS
65 MINS
8
Ingredients
- 1/4 cup Unsalted butter, melted
- 3/4 cup Packed light brown sugar
- 1 (20-ounce) can Sliced pineapple in juice, drained and juice reserved
- 10 Maraschino cherries, stems removed
- 1 1/2 cups All-purpose flour
- 1 1/2 teaspoons Baking powder
- 1/4 teaspoon Salt
- 1/2 cup Unsalted butter, softened
- 3/4 cup Granulated sugar
- 2 Large eggs, room temperature
- 1 teaspoon Vanilla extract
- 1/2 cup Reserved pineapple juice
Instructions
- Preheat your oven to 350 degrees Fahrenheit. Pour 1/4 cup of melted unsalted butter into the bottom of an ungreased 9-inch round cake pan. Sprinkle 3/4 cup of packed light brown sugar evenly over the butter. Pat the sugar mixture down firmly with a spatula until smooth.
- Drain the canned pineapple rings, making sure to save the leftover juice for the batter. Place one pineapple ring squarely in the center of the pan over the brown sugar layer. Arrange the remaining 6 to 7 rings in a tight circle around the center ring. Press one maraschino cherry (stem removed) into the hole of each pineapple ring. Place additional cherries in the empty spaces between the rings.
- In a medium mixing bowl, measure out 1 1/2 cups of all-purpose flour. Add 1 1/2 teaspoons of baking powder and 1/4 teaspoon of salt. Whisk everything together vigorously for at least 30 seconds. Set the bowl of dry ingredients aside.
- In a large bowl, cream 1/2 cup of softened unsalted butter and 3/4 cup of granulated sugar on medium-high speed for 2 to 3 minutes until light and fluffy. Beat in 2 large room temperature eggs, one at a time, mixing well after each addition. Add 1 teaspoon of vanilla extract. Pour in 1/2 cup of the reserved pineapple juice from the can and mix briefly on low speed.
- Pour the dry flour mixture into the wet ingredients. Use a silicone spatula to gently fold the batter just until combined. Spoon the batter carefully over the prepared pineapple and cherry layer in the cake pan. Smooth the top of the batter into an even layer with the back of a spoon or a small offset spatula.
- Bake in the preheated 350-degree oven for 40 to 45 minutes. Insert a toothpick into the center of the cake to test for doneness. It should come out clean or with a few moist crumbs. Remove the pan from the oven and place it on a wire cooling rack. Set a timer and let the cake rest undisturbed for exactly 10 minutes.
- Run a butter knife around the edge of the slightly cooled cake to loosen it. Place a large, flat serving plate upside down over the top of the cake pan. Hold the pan and plate tightly together and flip them over in one quick motion. Gently lift the cake pan straight up to reveal the caramelized topping.