Have you ever taken a bite of a dessert so extraordinary it made you close your eyes and sigh?
That is exactly what happens with this easy Salted Caramel Cheesecake Recipe. I spent weeks trying to recreate a ridiculously expensive slice I ordered at a cozy downtown bistro. My kitchen was a total mess of graham cracker crumbs and sticky sugar drips for days. But the effort was completely worth it.
Why You’ll Obsess Over This Salted Caramel Cheesecake (The’Better-Than-A-Bakery’Guarantee)
Let us be completely honest about homemade desserts. Sometimes they just do not measure up to the glass-case perfection of a professional patisserie.
This recipe shatters that rule entirely.
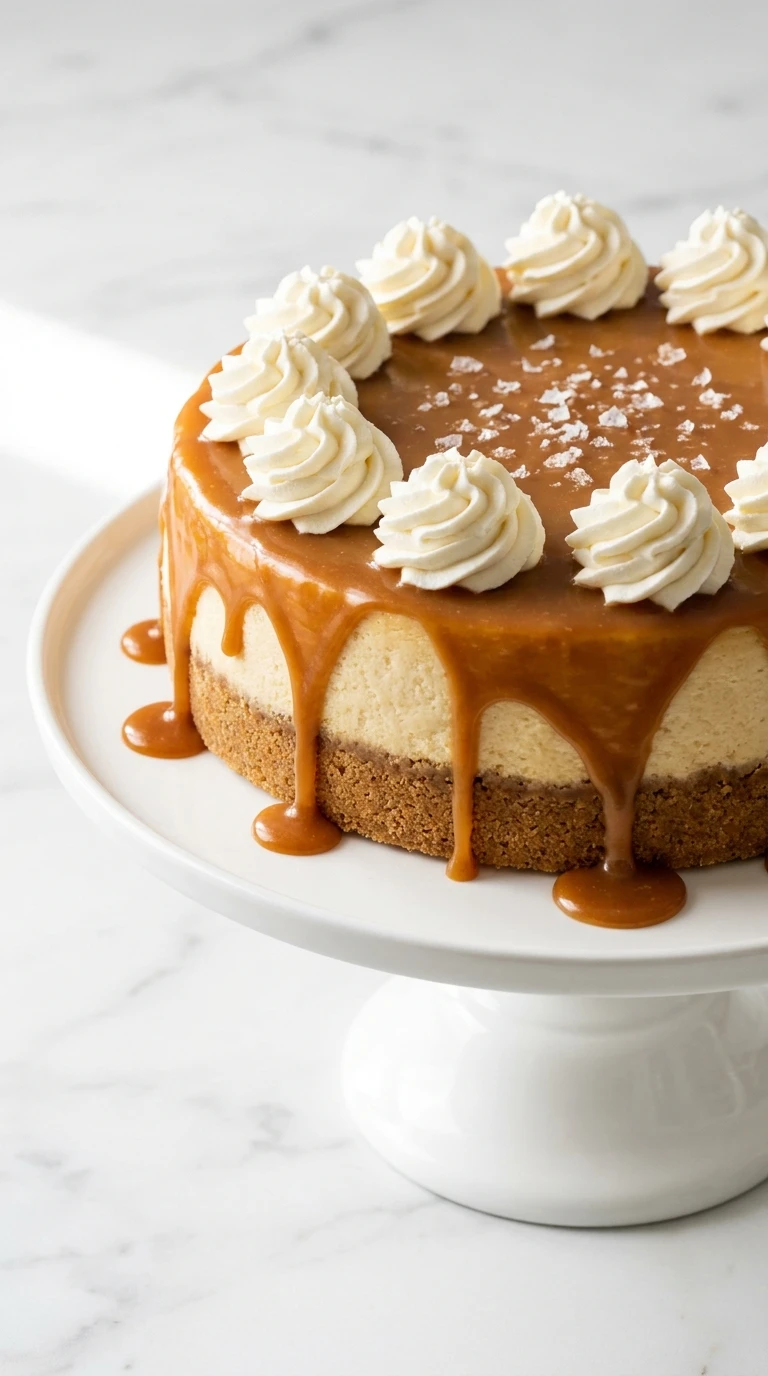
You are getting a dense and creamy center enveloped in a perfectly spiced buttery crust. The crown jewel is a generous pool of homemade salted caramel cascading down the sides. It looks incredibly intimidating to make. Yet it is shockingly simple to pull off in your own kitchen. Your friends will absolutely ask you for the name of the bakery you bought it from.
Baked vs. No-Bake: The Secret to that Coveted Melt-in-Your-Mouth Texture
There is a fierce debate in the dessert world about the best way to prepare this classic treat. I have experimented with both methods extensively. No-bake versions are fantastic for a quick summer afternoon.
However, baking your cheesecake is an absolute non-negotiable requirement if you want that iconic velvety texture.
The gentle oven heat transforms the eggs and cream cheese into a rich custard. It sets just enough to hold a clean slice while melting instantly on your tongue. Do not let the idea of a water bath scare you away from trying this out today. I will walk you through a foolproof method that guarantees a beautiful crack-free surface every single time.
Behind the Flavor: Balancing Rich Caramel, Tangy Cheese, and a Salty Crunch
A great dessert relies on the perfect harmony of contrasting flavors.
This rule is especially true when you are dealing with something as inherently sweet as caramel. The subtle tanginess of the cream cheese cuts right through the heavy sugar base to prevent the dessert from becoming cloying. Then comes the sheer magic of the sea salt.
Those delicate little flakes hit your palate just as the richness threatens to overwhelm your taste buds. It wakes up the entire flavor profile instantly. Every single forkful offers a beautiful symphony of buttery sweet notes and savory pops of salt. It is a wildly addictive combination that will have you reaching for a second slice before you even finish your first.
Ingredients
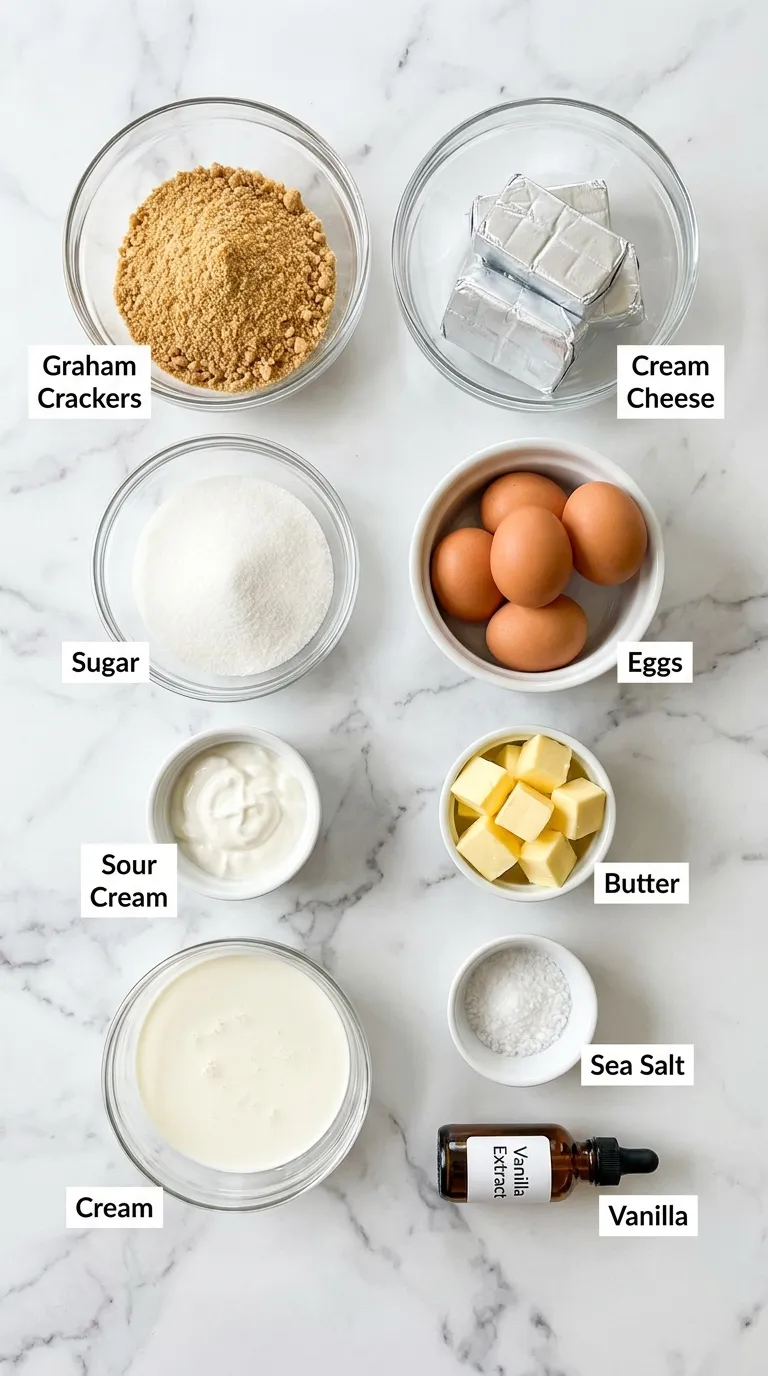
Creating the ultimate Salted Caramel Cheesecake Recipe starts with grabbing the right components from your pantry. High-quality dairy and fresh ingredients will make a massive difference in your final dessert.
What You’ll Need for the Ultimate Buttery Cookie Crust
A solid foundation is absolutely critical when building a heavy dessert. Graham crackers provide a wonderful honey-sweet crunch that pairs perfectly with the rich filling.
The Star of the Show: Our Ultra-Rich Cheesy Filling Components
Please make sure your dairy is completely softened to room temperature before you begin. Cold cream cheese will stubbornly refuse to blend smoothly. This mistake leaves annoying little white lumps scattered throughout your beautiful custard. Taking the time to warm your ingredients ensures a velvety slice.
The Liquid Gold: Ingredients for Foolproof Homemade Salted Caramel
Making caramel on your own stove might sound incredibly daunting at first. It is actually quite simple once you understand the basic process. Have all your pre-measured components sitting right next to the stove so you do not burn the sugar while searching for the cream.
The Finishing Touches (Don’t Skip the Flaky Sea Salt!)
The garnishes are what take this dessert from merely delicious to truly unforgettable. Those final crunchy flakes of salt provide the ultimate savory contrast to the sweet caramel.
Equipment You Will Need
You do not need an extensive collection of professional baking gear to achieve bakery-level results. A few strategic tools will make assembling your cheesecake a breeze. The water bath requires a solid roasting pan to protect your delicate crust from burning.
- 9-inch springform pan
- Heavy duty aluminum foil
- Stand mixer or electric hand mixer
- Large roasting pan
- Heavy-bottomed saucepan
- Rubber spatula
Method
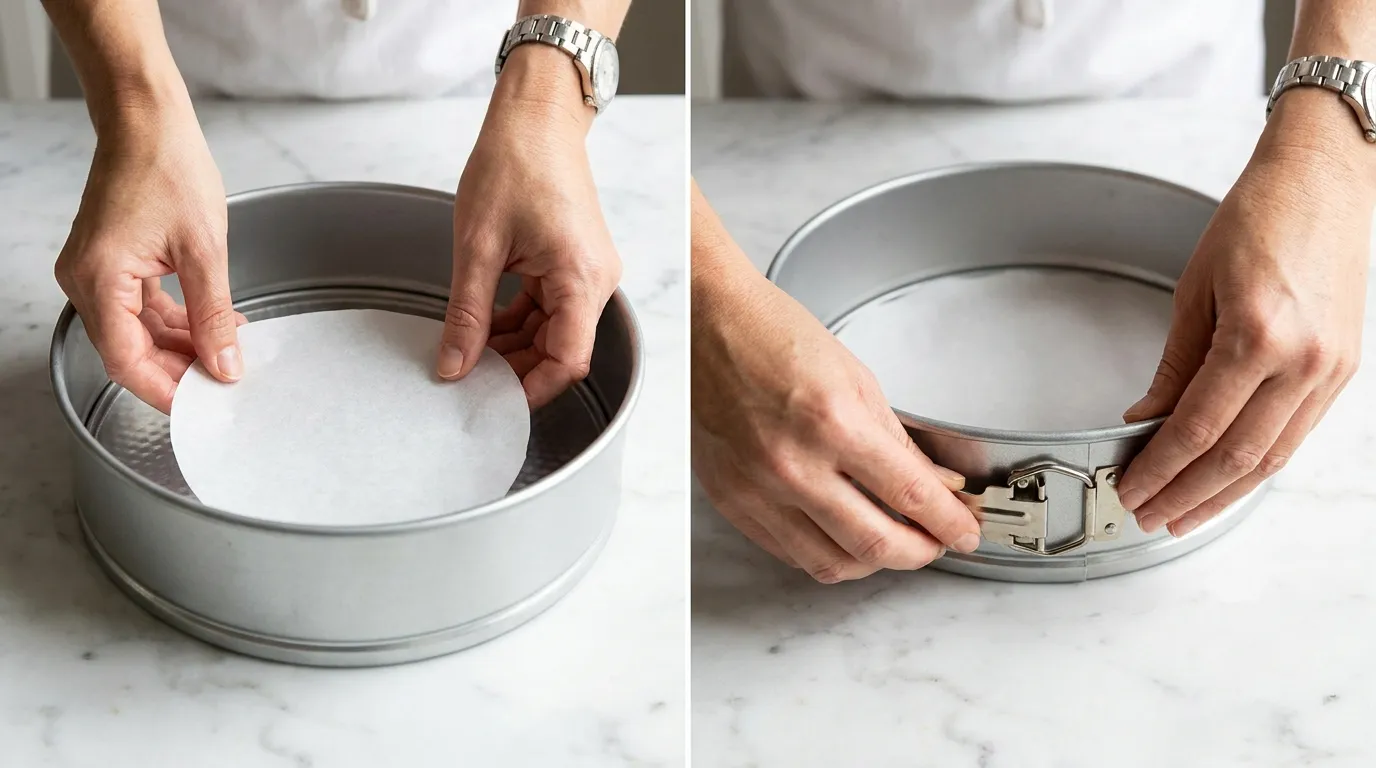
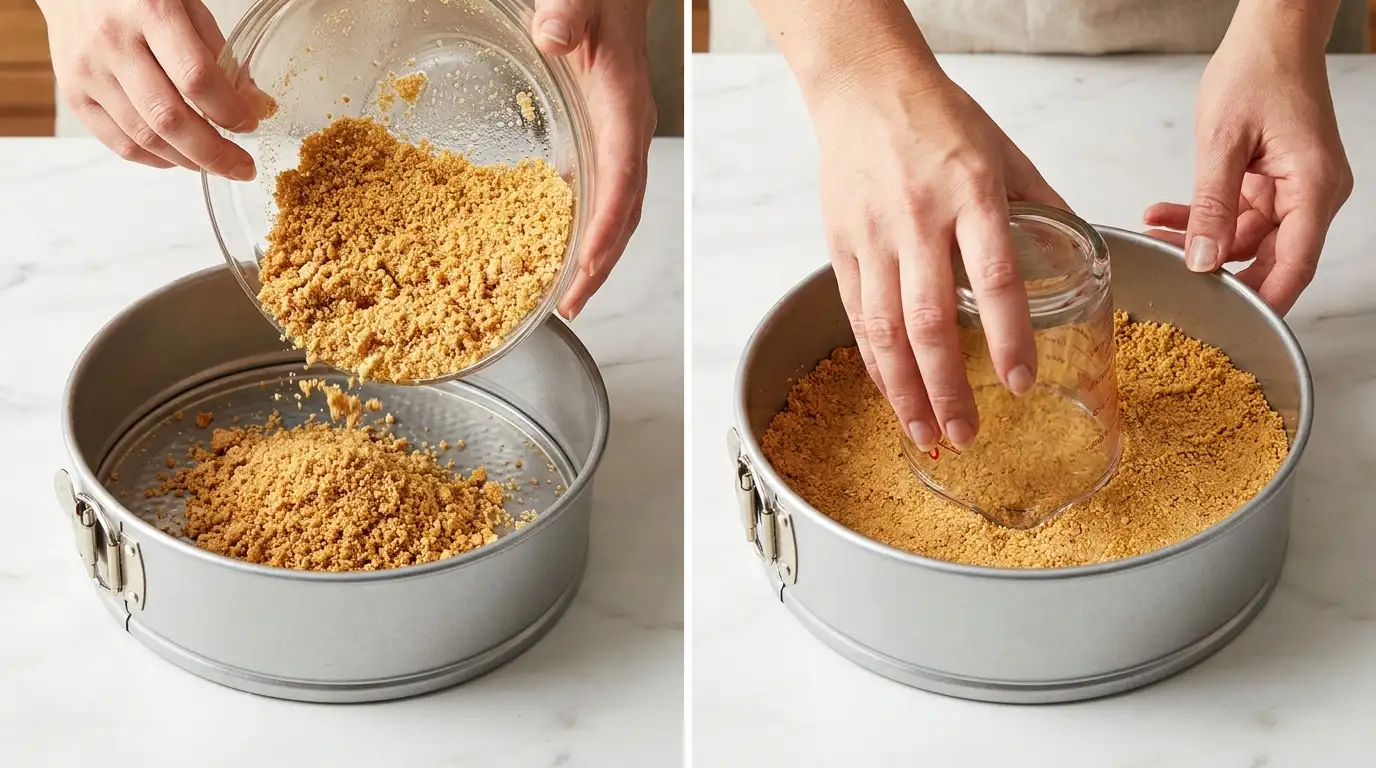
Step 1: Prepare the Springform Pan for an Easy Release
Setting up your pan correctly is the absolute most important foundation for this dessert. Nothing is worse than baking a gorgeous cheesecake only to have it stick stubbornly to the metal ring. Taking two minutes to prep will save you a massive headache later.
- Unclasp your 9-inch springform pan and remove the base.
- Cut a circle of parchment paper slightly larger than the base.
- Place the parchment over the base, attach the outer ring, and clamp it down tightly.
- Lightly grease the inside of the ring with butter or a non-stick baking spray.
This simple parchment trick ensures your crust will slide right off the metal base when you are ready to serve. The grease on the sides helps the filling pull away naturally as it cools.
Step 2: Smash the Cookies and Blind Bake the Crust
A phenomenal cheesecake needs a sturdy base to hold up all that rich dairy. Blind baking the crust guarantees a beautiful crunch that holds its own against the creamy filling. We want the mixture to feel exactly like wet sand.
- Preheat your oven to 350 degrees Fahrenheit.
- Pulse the graham crackers in a food processor until they are fine crumbs.
- Stir in the granulated sugar and melted butter until evenly moistened.
- Dump the mixture into your prepared pan and press it firmly into the bottom and slightly up the sides.
- Bake for exactly 10 minutes, then let it cool on a wire rack.
Use the bottom of a heavy drinking glass or a measuring cup to pack the crumbs down tightly. Do not be afraid to apply some serious pressure. A tightly packed crust will not crumble when you finally slice into it.
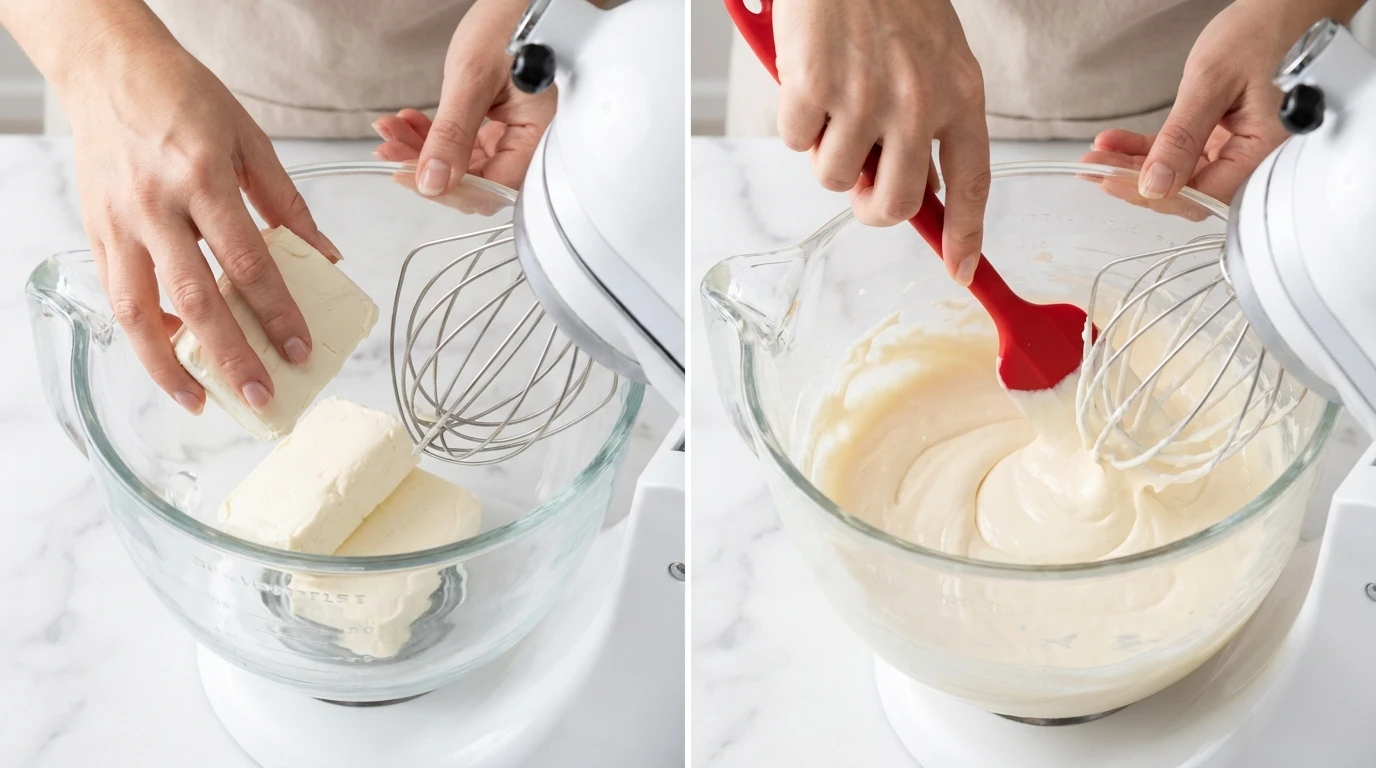
Step 3: Whip the Cream Cheese and Sugar Until Ridiculously Smooth
This is where patience becomes your best tool in the kitchen. Lumpy cheesecake is usually the result of cold ingredients or rushing the mixing process. You want a base that looks like thick, glossy buttercream.
- Place your completely room-temperature cream cheese into the bowl of a stand mixer fitted with the paddle attachment.
- Beat the cream cheese on medium speed for about two minutes until totally smooth.
- Gradually pour in the granulated sugar while the mixer is running on low.
- Stop the mixer and scrape down the bottom and sides of the bowl with a rubber spatula.
Scraping the bowl is non-negotiable. Cream cheese loves to stick to the very bottom curve of the mixing bowl where the paddle cannot quite reach. If you skip this, those unmixed pockets will ruin your silky texture.
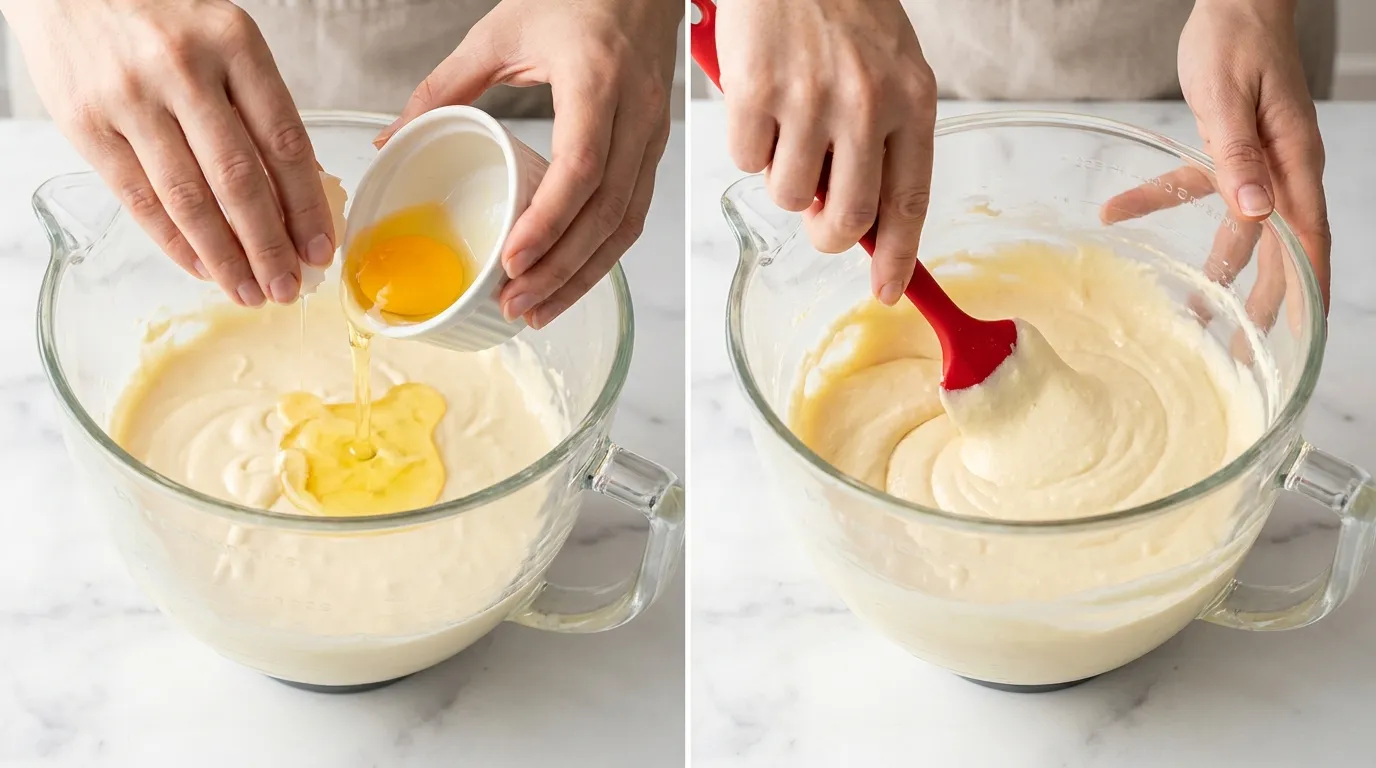
Step 4: Incorporate the Eggs and Cream Without Over-Mixing
Once the eggs enter the bowl, your mixing strategy needs to change entirely. Beating the batter wildly at this stage forces tiny air bubbles into the eggs. Those bubbles will expand in the heat of the oven and collapse as it cools, leading to a massive crater in your dessert.
- Keep your mixer on the absolute lowest speed setting.
- Add the room-temperature eggs one at a time, waiting until the yolk just barely disappears before adding the next.
- Spoon in the sour cream and pour in the vanilla extract.
- Mix for just 15 more seconds to bring it all together.
- Give it one final gentle fold by hand using a silicone spatula.
The sour cream is a magical ingredient here. It adds a necessary acidic tang that brightens the heavy cream cheese. Your finished batter should look pourable, thick, and incredibly glossy.
Step 5: Set Up the Foolproof, Leak-Free Water Bath
I know a water bath sounds incredibly fussy. It is actually your best defense against a cracked, rubbery dessert. Cheesecakes are technically custards, and custards demand a gentle, humid environment to bake properly.
- Tear off three large, separate sheets of heavy-duty aluminum foil.
- Place your cooled springform pan in the center and tightly wrap the foil up the sides.
- Pour your prepared cream cheese filling over the baked graham cracker crust.
- Place the foil-wrapped pan into a larger, high-sided roasting pan.
- Carefully pour boiling water into the roasting pan until it reaches halfway up the side of the springform pan.
Regular aluminum foil is simply too thin and prone to micro-tears. Always opt for the heavy-duty version. Leaking water will instantly turn your perfectly buttery graham crust into mush.

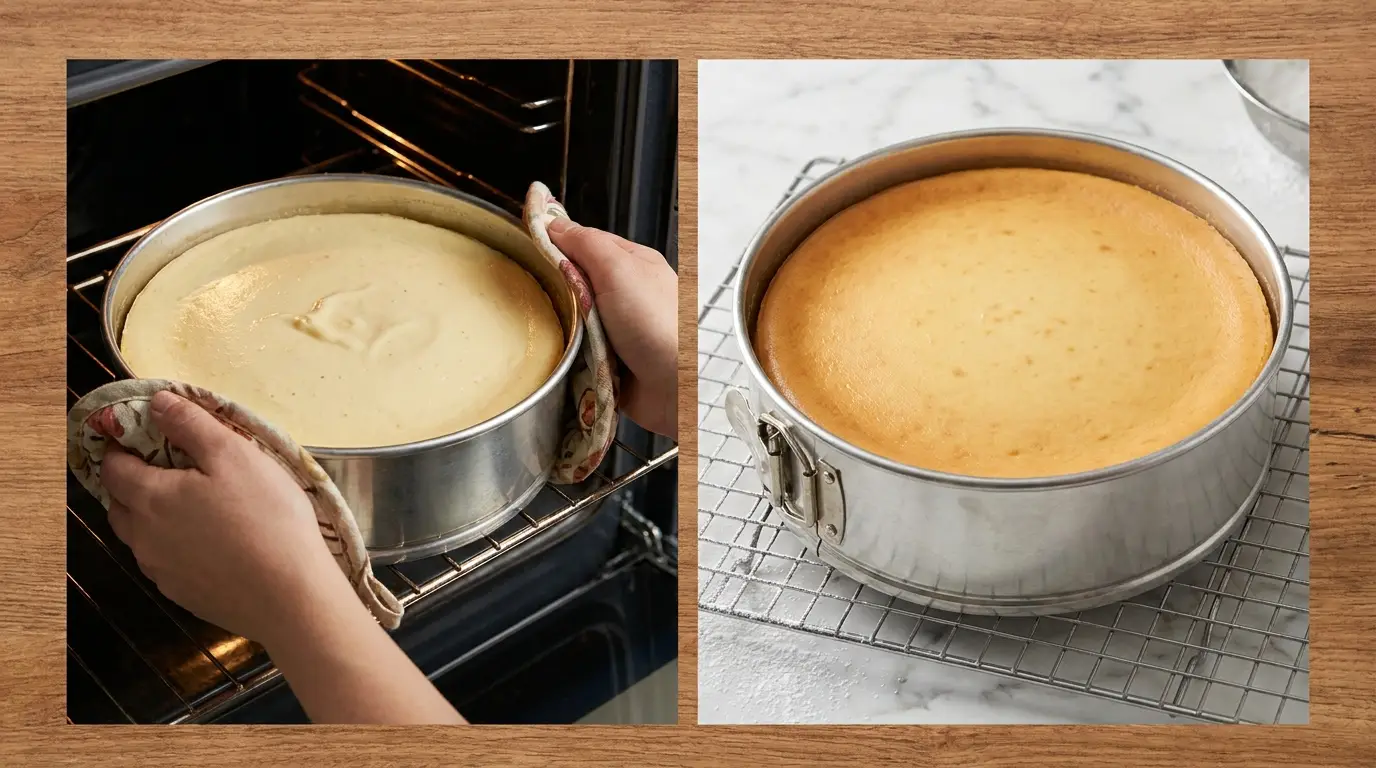
Step 6: Bake Until the Center Has the Perfect’Jiggle’
Baking time is always an estimate because every single oven runs a little differently. You need to rely on your eyes rather than just your kitchen timer to know when this dessert is truly finished.
- Lower your oven temperature to 325 degrees Fahrenheit.
- Bake the cheesecake for 55 to 70 minutes.
- Gently nudge the side of the pan with an oven mitt. The outer two inches should be completely set and slightly puffed.
- The dead center should still wobble gently, similar to the movement of set gelatin.
- Turn the oven off completely, crack the door open about an inch, and leave the cheesecake inside for 1 full hour.
That slow cooling process in the turned-off oven is the ultimate secret. It gently lowers the temperature of the custard without shocking it. Sudden drafts of cold kitchen air are a guaranteed recipe for surface cracks.
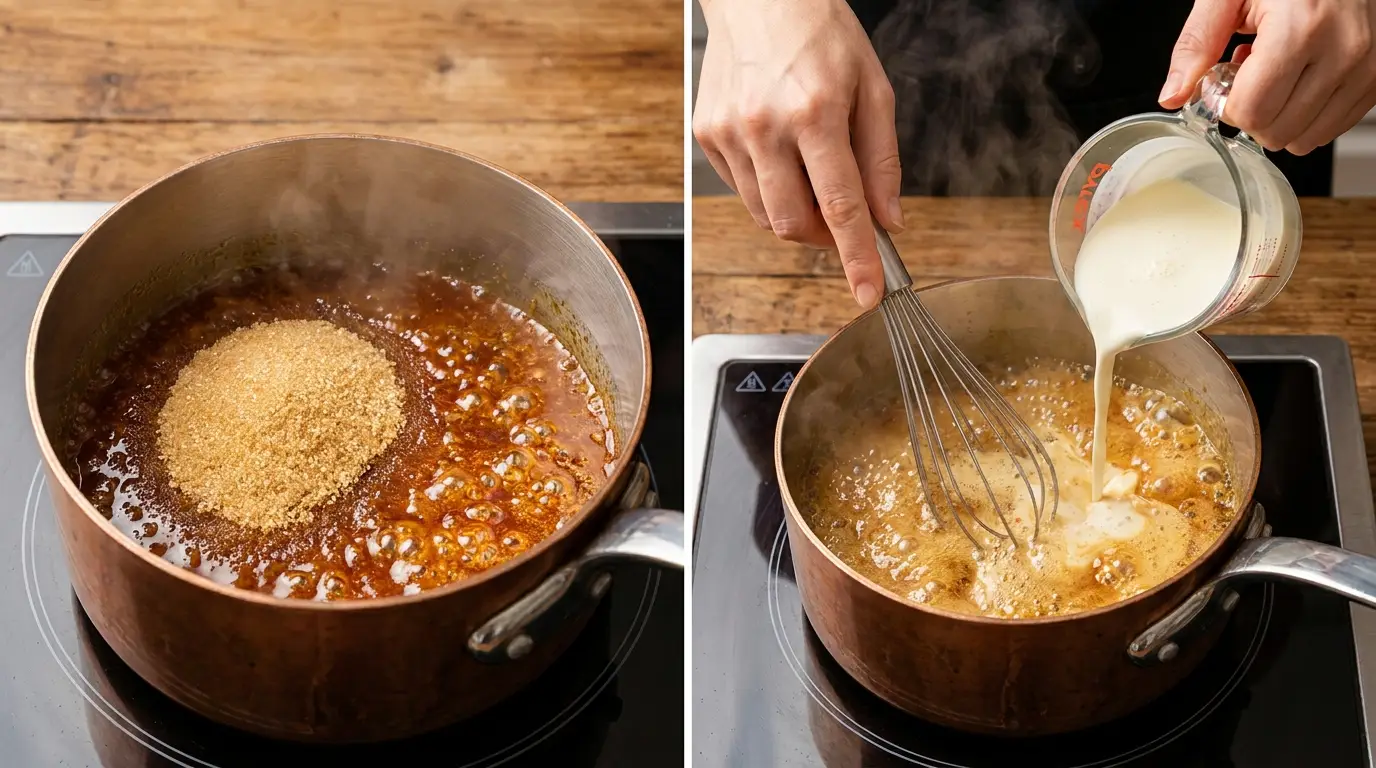
Step 7: Melt and Simmer the Homemade Salted Caramel Sauce
While the cheesecake takes its long nap in the oven, you have plenty of time to tackle the caramel. Making sugar work for you requires undivided attention. Put your phone away and keep your eyes on the bubbling pot.
- Combine the granulated sugar and water in a heavy-bottomed saucepan over medium heat.
- Allow the sugar to melt and bubble. Do not stir it with a spoon. Instead, gently swirl the pan by the handle.
- Watch closely as the syrup turns from clear, to champagne, to a deep amber color. This takes about 5 to 8 minutes.
- Immediately remove the pan from the heat and whisk in the cubed butter until melted.
- Slowly pour in the heavy cream while whisking rapidly. It will bubble up furiously.
- Stir in the vanilla extract and the flaky sea salt, then set it aside to cool.
The transition from a gorgeous amber caramel to a bitter burnt mess happens in seconds. Pull it off the heat just a moment before you think it is perfectly dark, as the residual heat will continue to cook it.
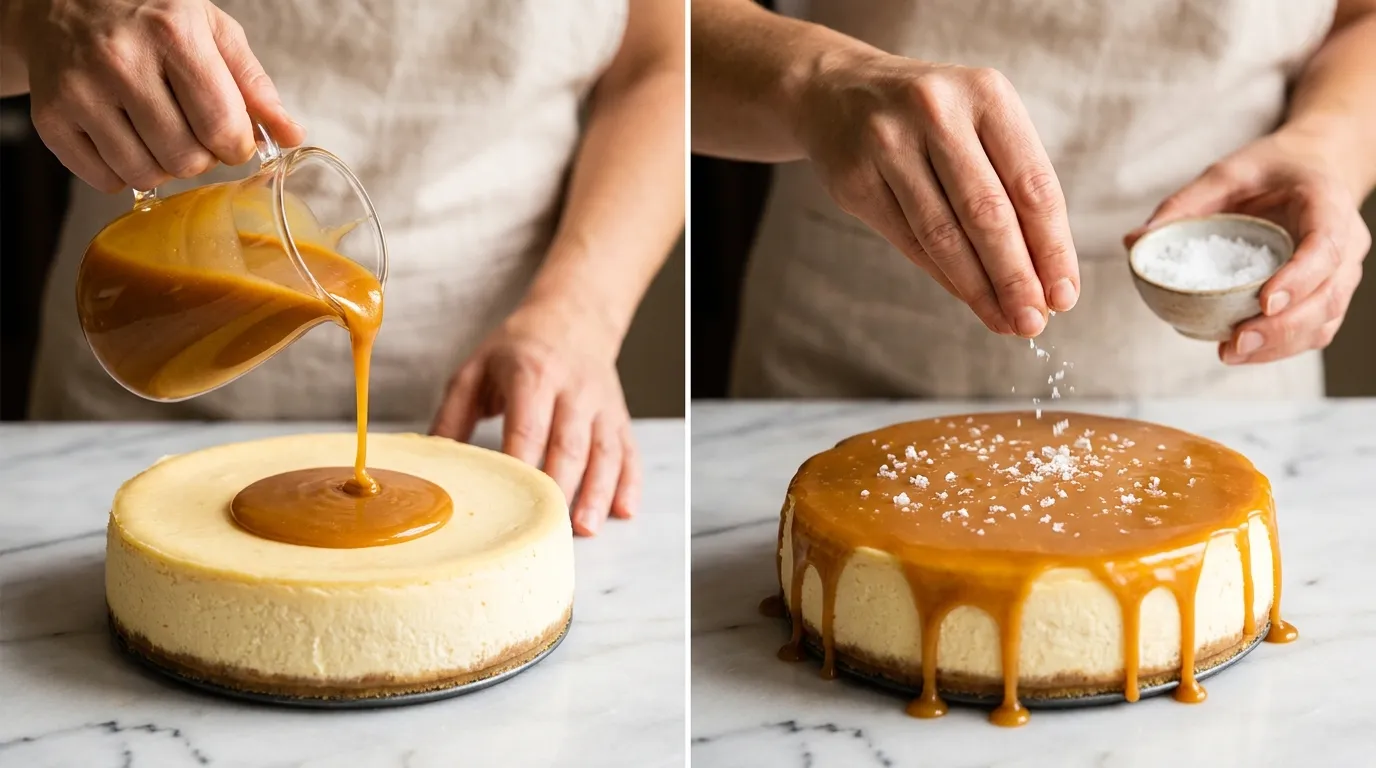
Step 8: Chill Overnight, Drizzle Generously, and Garnish
You are in the home stretch now. The cheesecake has baked, cooled, and survived the water bath. But it is not ready to eat quite yet. Cutting into a warm cheesecake will result in a messy, crumbling slice.
- Remove the cooled cheesecake from the water bath and discard the wet foil.
- Run a thin butter knife gently around the inside rim of the pan to loosen the edges.
- Cover the top tightly with plastic wrap and place it in the refrigerator for at least 12 hours.
- When ready to serve, unclasp the springform ring and transfer the dessert to a stand.
- Pour a generous layer of your cooled homemade salted caramel over the top.
- Finish with a sprinkle of extra flaky sea salt and optional piped whipped cream rosettes.
The overnight chill sets the dairy and solidifies the fats in the butter and cream cheese. The flavor actually deepens significantly on the second day. It is an exercise in extreme patience, but the perfect slice is your reward.
The Ultimate Cheat Sheet for Preventing Cheesecake Cracks
Nothing brings more anxiety to a baker than pulling a cheesecake out of the oven only to discover a massive fault line running down the middle. Cracks do not affect the taste, but they certainly ruin the bakery aesthetic. Over-beating the eggs is the number one culprit. Be gentle with your batter once the eggs hit the bowl. Sudden temperature changes also shock the fragile custard. Keep the oven door closed while it bakes. Finally, do not skip the water bath. That humid environment is your ultimate insurance policy for a flawless, smooth top.
Common Caramel Mistakes to Avoid (And Exactly How to Fix Them)
Sugar work intimidates almost everyone. The most common error is aggressive stirring. Once the sugar and water are melting, keep your spoons completely out of the pot. Stirring encourages crystallization. If you see sugar crystals forming on the sides of your pan, dip a pastry brush in water and gently wash them down. If your finished caramel seizes up when you add the cream, do not panic. Simply put it back on very low heat and whisk constantly until those hardened sugar chunks melt back into the sauce.
Freezing & Storage Secrets for Make-Ahead Success
This dessert is an absolute dream for meal prepping before a big event. A fully baked and chilled cheesecake will last for up to five days in the refrigerator if kept in an airtight container. If you want to freeze it, wait until it has completely chilled overnight. Do not add the caramel layer yet. Wrap the entire cheesecake tightly in two layers of plastic wrap, followed by a layer of heavy-duty foil. It will survive perfectly in the freezer for up to two months. Thaw it overnight in the fridge, then add your fresh caramel right before slicing.
Next-Level Upgrades: Pretzel Crusts, Fall Fruits, and Biscoff Swaps
Once you master this base recipe, you can customize it endlessly. Swap the graham crackers out for crushed pretzels to double down on that salty-sweet dynamic. A pretzel crust requires slightly more butter, so add an extra tablespoon to get that wet sand texture. In the autumn, top the caramel layer with gently sautéed cinnamon apples or spiced pears. If you are a cookie butter fanatic, replace the crust with crushed Biscoff cookies and drizzle melted cookie butter alongside the caramel. The possibilities for customization are massive.
Nutritional Information
Estimated Nutrition Per Serving (1 Slice)
*Nutritional values are approximate and may vary based on specific ingredients and portion sizes used.
Frequently Asked Questions
Can I use store-bought caramel sauce instead of making it from scratch?
You absolutely can. If you are short on time, a high-quality jarred caramel works wonderfully. Just gently warm it in the microwave for a few seconds so it pours smoothly over the chilled cheesecake, and do not forget to add your own flaky sea salt on top.
Why did my cheesecake crack even though I used a water bath?
Cracks usually happen for two reasons. You may have over-mixed the batter after adding the eggs, trapping air that expanded in the oven. Alternatively, the cake may have cooled down too rapidly. Leaving the cake in the turned-off oven for an hour is crucial for preventing temperature shock.
Can I substitute the sour cream for something else?
Yes. Plain, full-fat Greek yogurt is an excellent one-to-one substitute for sour cream. It provides the same necessary acidic tang and creamy moisture required to balance out the dense cream cheese.
How do I get perfectly clean slices without destroying the crust?
The trick is using heat. Run a sharp chef’s knife under very hot water for a few seconds. Wipe the blade completely dry with a towel, and make your cut. Repeat this hot water and drying process for every single slice to avoid dragging the filling.

Salted Caramel Cheesecake
AUTHOR: True Taste Buds
A dense and creamy center enveloped in a perfectly spiced buttery crust, finished with a generous pool of homemade salted caramel and flaky sea salt.
30 MINS
75 MINS
105 MINS
12
Ingredients
- 2 cups Graham cracker crumbs
- 3 tablespoons Granulated sugar
- 6 tablespoons Unsalted butter, melted
- 4 (8 ounce) blocks Full-fat cream cheese, room temperature
- 1 cup Granulated sugar
- 1 cup Sour cream, room temperature
- 1 tablespoon Vanilla extract
- 4 large Eggs, room temperature
- 1 cup Granulated sugar (for caramel)
- 1/4 cup Water
- 6 tablespoons Unsalted butter, cut into cubes
- 1/2 cup Heavy cream, room temperature
- 1 teaspoon Vanilla extract (for caramel)
- 2 teaspoons Flaky sea salt, divided
- 1/2 cup Homemade caramel sauce, reserved from above
- 1 teaspoon Flaky sea salt, reserved from above
- 1 cup Heavy whipping cream, cold
- 2 tablespoons Powdered sugar
Instructions
- Unclasp your 9-inch springform pan and remove the base. Cut a circle of parchment paper slightly larger than the base. Place the parchment over the base, attach the outer ring, and clamp it down tightly. Lightly grease the inside of the ring with butter or a non-stick baking spray.
- Preheat your oven to 350 degrees Fahrenheit. Pulse the graham crackers in a food processor until they are fine crumbs. Stir in the granulated sugar and melted butter until evenly moistened. Dump the mixture into your prepared pan and press it firmly into the bottom and slightly up the sides. Bake for exactly 10 minutes, then let it cool on a wire rack.
- Place your completely room-temperature cream cheese into the bowl of a stand mixer fitted with the paddle attachment. Beat the cream cheese on medium speed for about two minutes until totally smooth. Gradually pour in the granulated sugar while the mixer is running on low. Stop the mixer and scrape down the bottom and sides of the bowl with a rubber spatula.
- Keep your mixer on the absolute lowest speed setting. Add the room-temperature eggs one at a time, waiting until the yolk just barely disappears before adding the next. Spoon in the sour cream and pour in the vanilla extract. Mix for just 15 more seconds to bring it all together. Give it one final gentle fold by hand using a silicone spatula.
- Tear off three large, separate sheets of heavy-duty aluminum foil. Place your cooled springform pan in the center and tightly wrap the foil up the sides. Pour your prepared cream cheese filling over the baked graham cracker crust. Place the foil-wrapped pan into a larger, high-sided roasting pan. Carefully pour boiling water into the roasting pan until it reaches halfway up the side of the springform pan.
- Lower your oven temperature to 325 degrees Fahrenheit. Bake the cheesecake for 55 to 70 minutes. Gently nudge the side of the pan with an oven mitt. The outer two inches should be completely set and slightly puffed. The dead center should still wobble gently, similar to the movement of set gelatin. Turn the oven off completely, crack the door open about an inch, and leave the cheesecake inside for 1 full hour.
- Combine the granulated sugar and water in a heavy-bottomed saucepan over medium heat. Allow the sugar to melt and bubble. Do not stir it with a spoon. Instead, gently swirl the pan by the handle. Watch closely as the syrup turns from clear, to champagne, to a deep amber color. This takes about 5 to 8 minutes. Immediately remove the pan from the heat and whisk in the cubed butter until melted. Slowly pour in the heavy cream while whisking rapidly. It will bubble up furiously. Stir in the vanilla extract and the flaky sea salt, then set it aside to cool.
- Remove the cooled cheesecake from the water bath and discard the wet foil. Run a thin butter knife gently around the inside rim of the pan to loosen the edges. Cover the top tightly with plastic wrap and place it in the refrigerator for at least 12 hours. When ready to serve, unclasp the springform ring and transfer the dessert to a stand. Pour a generous layer of your cooled homemade salted caramel over the top. Finish with a sprinkle of extra flaky sea salt and optional piped whipped cream rosettes.