
Why This Tiramisu Cheesecake Will Ruin You For All Other Desserts
Let me be completely honest with you for a second. This Tiramisu Cheesecake Recipe is downright dangerous.
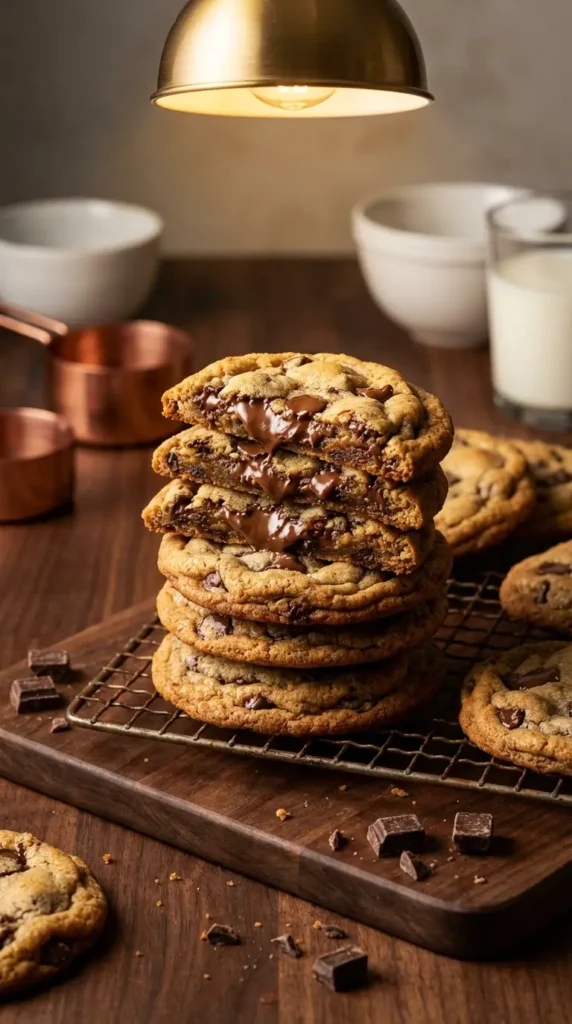
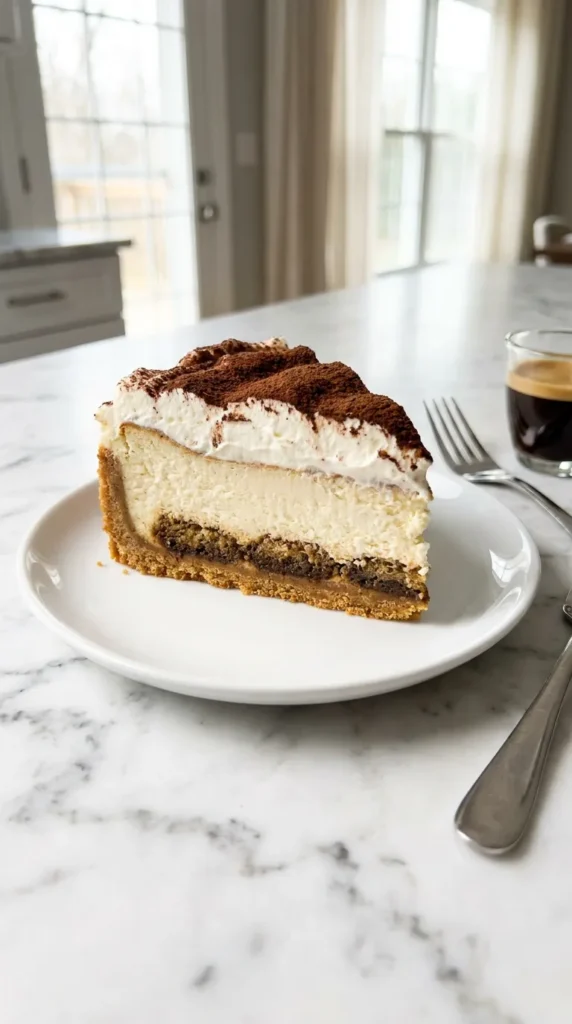
I baked this for a dinner party last weekend and the entire table went completely silent after the first bite. That is the ultimate sign of dessert success. You get the rich espresso soaked ladyfingers and the unmistakable tang of a classic cheesecake all in one glorious slice. It perfectly balances the delicate nature of a traditional Italian tiramisu with the dense indulgence we expect from a proper baked dessert.
You will never want a standard vanilla bean cheesecake again.
The Italian-Meets-New-York Dessert Mashup You’ve Been Waiting For
We all love a good crossover. Think about the magic that happens when you combine two undisputed titans of the dessert world.
New York style cheesecake brings a heavy creaminess that coats the back of a spoon. Traditional tiramisu offers a cloud of mascarpone and a sharp hit of dark coffee. Marrying them creates a textural masterpiece that hits every single craving simultaneously. The coffee liqueur cuts right through the richness of the cream cheese while a generous dusting of dark cocoa powder adds a slightly bitter finish. Every single layer works together in perfect harmony.
It feels incredibly fancy but secretly comes together with surprisingly little effort.
The Secret to That Fluffy, Melt-in-Your-Mouth Texture (Baked vs. No-Bake)
There is a massive debate in the baking community about how to handle cheesecakes.
Some people swear by the quick fridge set of a no bake recipe. I completely understand the appeal of skipping the water bath. However, this specific Tiramisu Cheesecake Recipe demands the slow and steady heat of an oven. Baking the filling gives it a velvety structure that stands up to the espresso syrup without turning into a soggy mess. The slow bake gently sets the mascarpone and cream cheese blend into a luscious custard.
Trust me on this one.
Taking the extra time to bake this dessert ensures you get clean slices and a melt in your mouth texture that will have everyone begging for the recipe.
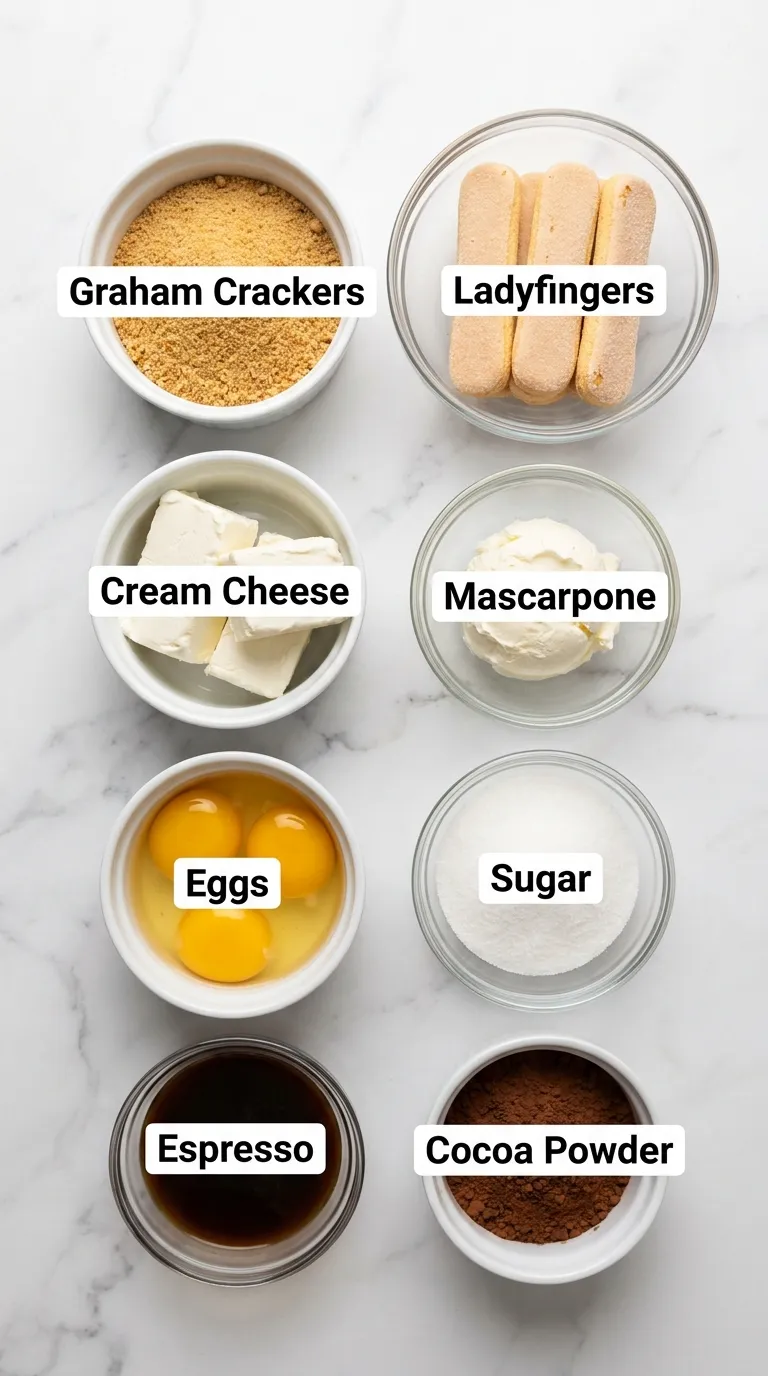
Ingredients
Building the Best Base: Graham Crackers vs. Amaretti Cookies
A traditional cheesecake crust usually leans on graham crackers. We are taking things up a notch by giving you options for this recipe. Crushed amaretti cookies add a beautiful almond flavor that pairs perfectly with the coffee notes. Graham crackers provide a more classic dessert experience and hold together exceptionally well under the heavy filling. I prefer using graham crackers for a sturdy base that lets the Italian flavors of the filling shine.
The choice is completely up to you.
The Perfect Espresso Soak (And Easy Booze-Free Swaps!)
You cannot have a Tiramisu Cheesecake Recipe without a proper coffee soak. This step is where the dessert really gets its unmistakable identity. You want to use a strongly brewed espresso that has been completely cooled so it does not turn your ladyfingers into mush. I love adding a splash of dark rum to the liquid for that authentic bite.
Need a family friendly version?
You can easily swap the rum for a few drops of rum extract or simply leave it out altogether. The espresso will still provide plenty of robust flavor.
The Ultimate Cheese Blend: Why Mascarpone Needs a Cream Cheese Sidekick
Authentic tiramisu relies entirely on mascarpone cheese for its creamy layers. It is incredibly rich and delicious but surprisingly delicate. If you try to bake a cheesecake using only mascarpone it will completely collapse in the oven.
That is where cream cheese comes to the rescue.
Blending standard cream cheese with the mascarpone creates the ultimate structural support. You get the distinct sweet and milky flavor of the Italian cheese along with the dense reliability of a New York style slice. Make absolutely sure your cheeses are at room temperature before you start mixing. Cold cheese will leave annoying lumps in your beautiful batter.
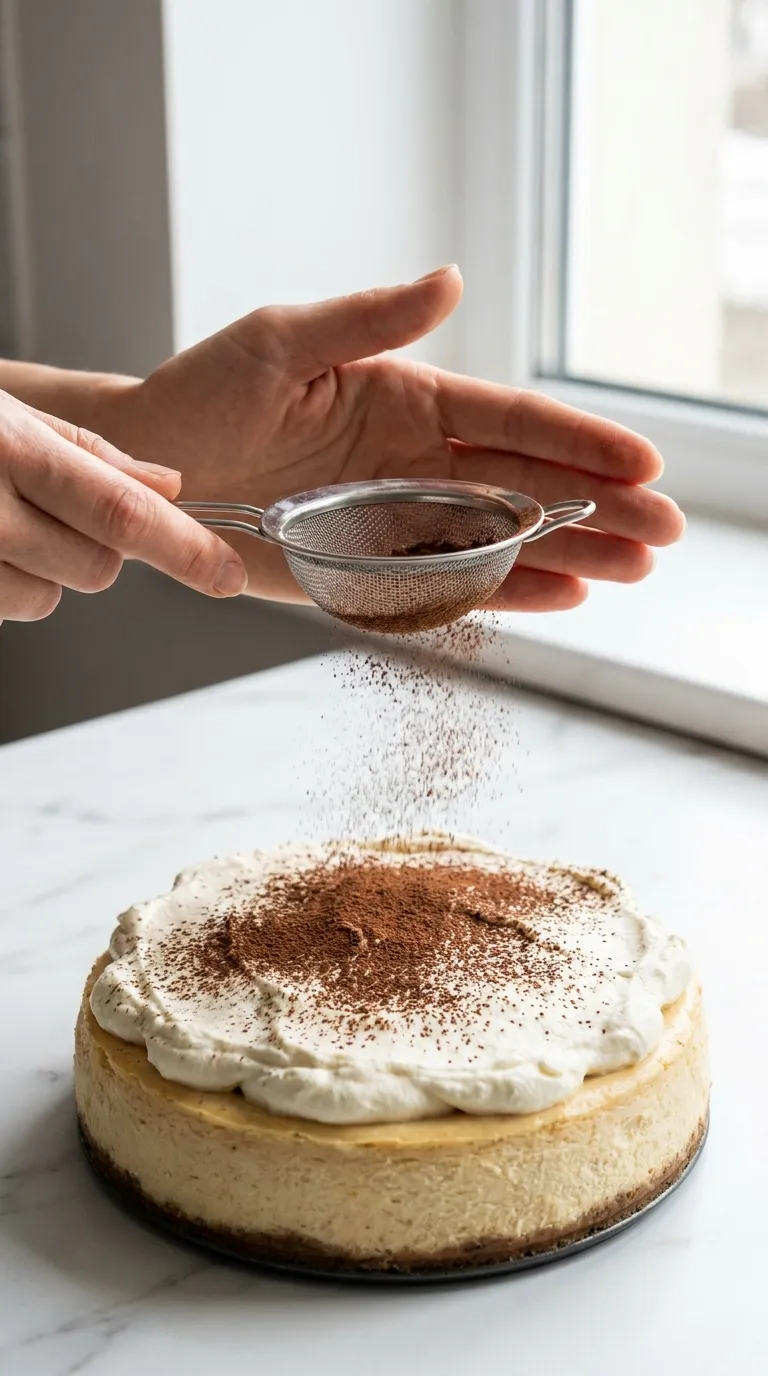
Crowning Glory: The Secret to the Best Mascarpone Whipped Topping
Every great cheesecake needs a beautiful topping to hide any tiny imperfections. We are making a stabilized whipped cream that tastes exactly like the top layer of a traditional tiramisu. Adding a smaller amount of cold mascarpone to the heavy cream thickens the mixture beautifully.
It creates a frosting that holds its shape for days in the fridge.
Do not forget the final dusting of cocoa powder. That slightly bitter cocoa finish is the perfect contrast to the sweet cream and rich espresso flavors beneath it.
Equipment Needed
Having the right tools makes baking this dessert an absolute breeze. A heavy springform pan is nonnegotiable for getting perfectly clean edges without destroying your crust.
Instructions
Step 1: Laying the Foundation: Crafting and Par-Baking the Buttery Crust
Begin by preheating your oven to 325 degrees Fahrenheit. We want a nice gentle heat to start our baking process.
In a medium mixing bowl, combine your graham cracker crumbs and light brown sugar. Pour in the melted butter and stir it around with a fork. You are looking for a texture that highly resembles wet sand. It should hold together slightly when you squeeze a handful in your palm.

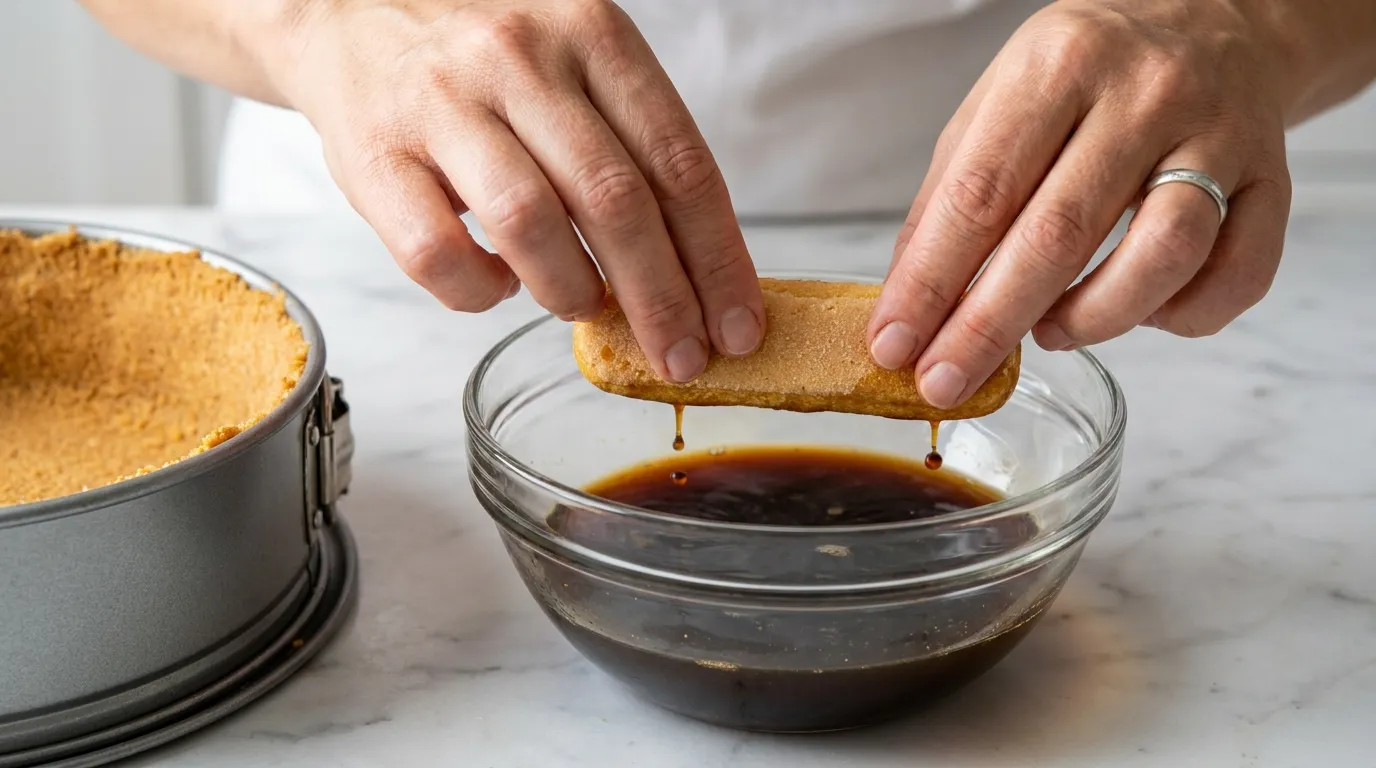
Step 2: The Quick Coffee Dip: How to Avoid the Dreaded Soggy Ladyfinger
Here is where the magic really starts to take shape. Grab a wide, shallow bowl and pour in your strongly brewed, cooled espresso and dark rum.
Ladyfingers act exactly like little absorbent sponges. If you leave them in the liquid for more than a second, they will completely disintegrate and ruin the sturdy base of your cheesecake.
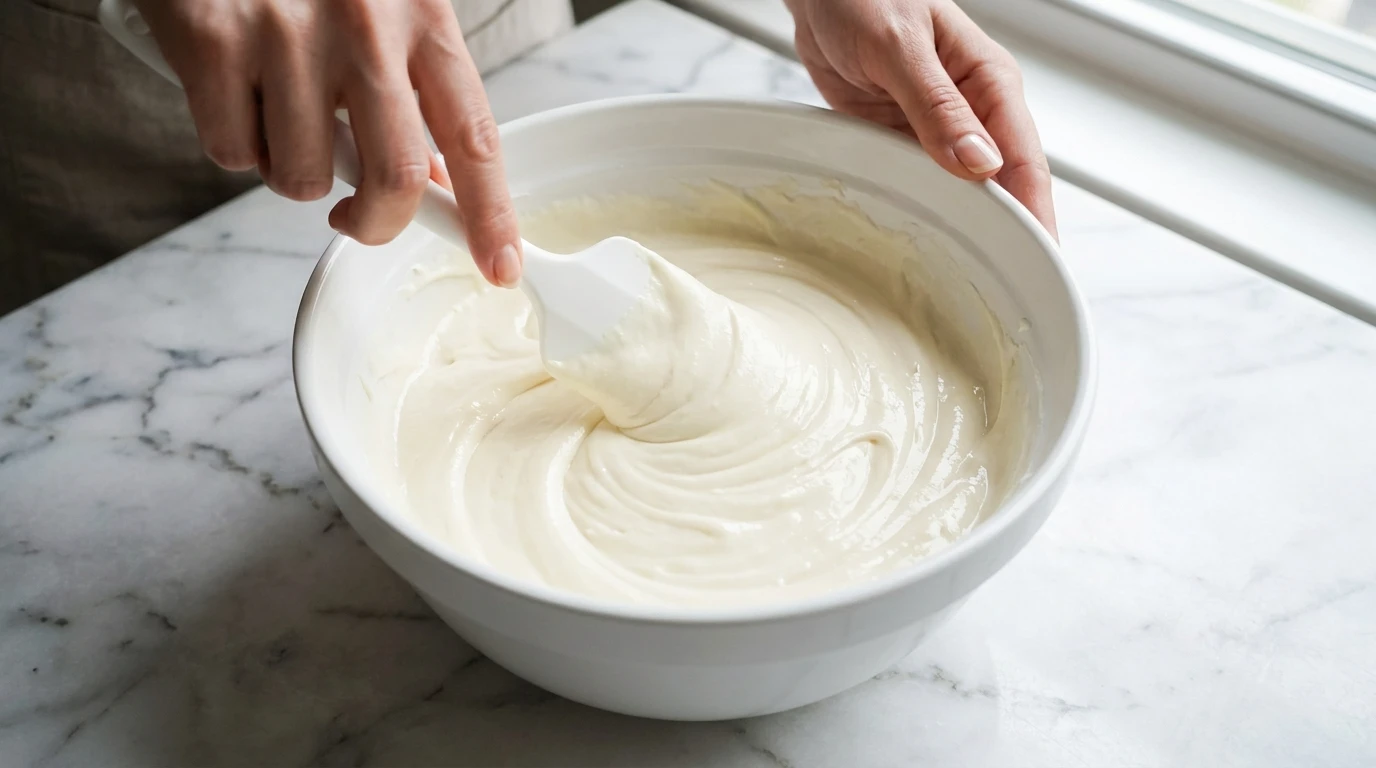
Step 3: Whipping Up the Cloud-Like Filling (Zero Lumps Guaranteed!)
This luscious filling is the actual heart of our Tiramisu Cheesecake Recipe. Add your room temperature cream cheese to the large bowl of a stand mixer fitted with a paddle attachment.
Beat the cream cheese on medium speed for about three minutes until it is completely smooth and creamy. Stop and scrape down the sides and bottom of the bowl with a rubber spatula. Add the room temperature mascarpone cheese and granulated sugar. Blend them together until the entire mixture is incredibly velvety and looks like a thick, glossy cloud.
Step 4: The Fearless Water Bath: Your Secret to a Jiggly, Crack-Free Center
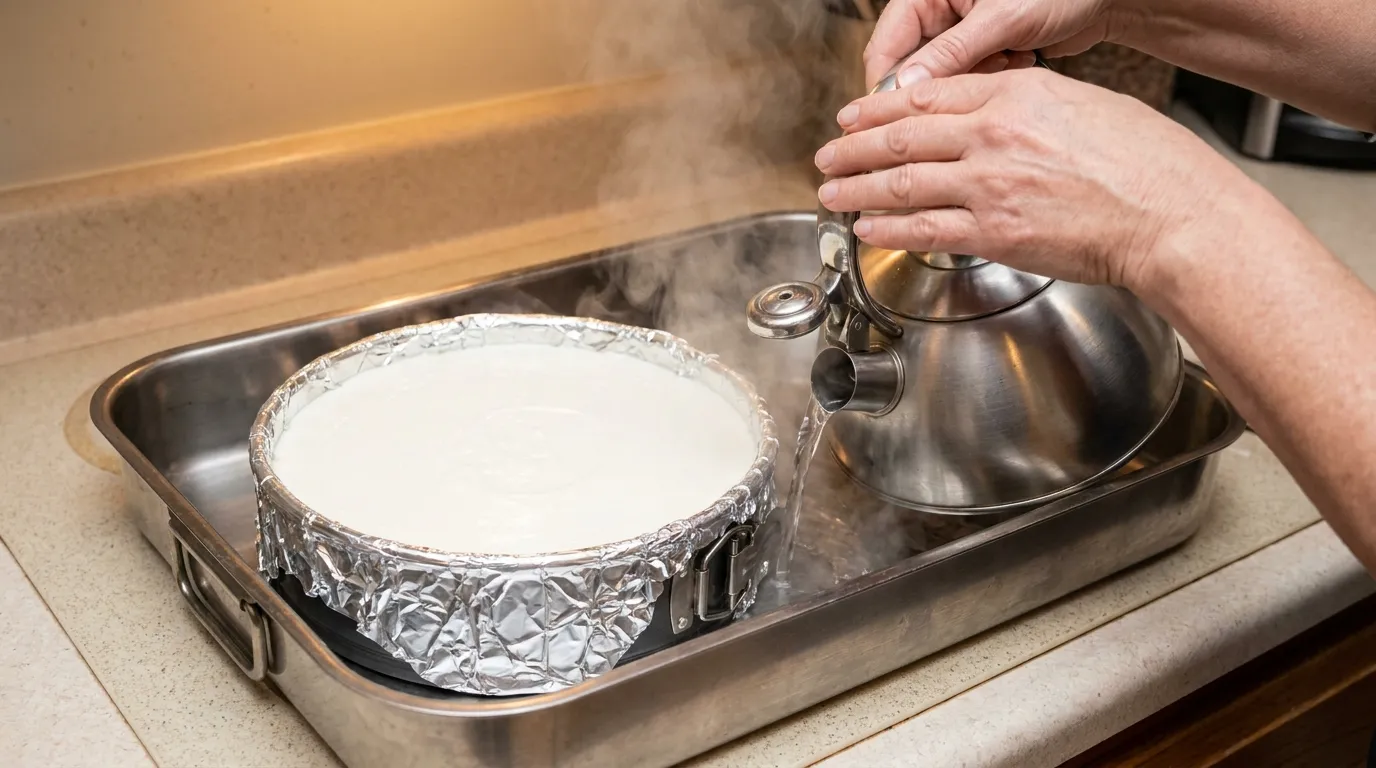
I know water baths sound incredibly intimidating to home bakers. I promise they are extremely easy to set up and absolutely essential for this dessert.
The steam rising from the hot water creates a gentle, humid baking environment that sets the cheesecake evenly. Wrap the bottom and sides of your springform pan tightly with heavy duty aluminum foil to waterproof it. Pour your luscious cheese batter directly over the prepared ladyfinger layer. Smooth the top gently with an offset baking spatula.
Step 5: The Crucial Chill: Why an Overnight Rest is Absolutely Non-Negotiable
Once the baking time is complete, turn off the oven completely and leave the cheesecake sitting inside. Crack the oven door open about an inch.
Let the delicate cheesecake slowly cool down inside the dark oven for a full hour. This gradual temperature shift is your absolute best defense against thermal shock and surface cracking. After the hour passes, remove the pan from the water bath, carefully peel off the wet foil, and let the pan sit on a wire cooling rack.
The Hot-Knife Trick: Getting Bakery-Worthy Slices Every Single Time
After all that incredible hard work, you want to serve visually flawless pieces to your family and guests.
Fill a tall, heatproof pitcher with very hot tap water. Dip a large, sharp chef knife into the hot water for about ten seconds to thoroughly heat the metal blade. Wipe the blade completely dry with a clean kitchen towel. Make your first firm slice directly into the chilled cake, pulling the knife smoothly out the back. Wipe the blade clean with your towel, dip it into the hot water again, and repeat the heating process for every single cut. The warm blade easily melts right through the dense cream cheese, giving you incredibly sharp and clean edges on every slice.
Make-Ahead & Freezing Secrets for Stress-Free Entertaining
This magnificent dessert is an absolute dream for dinner parties simply because you can prepare it several days in advance.
You can safely keep the plain baked cheesecake wrapped securely in the fridge for up to four full days before you plan to serve it. If you want to freeze it for a future event, wait until the baked cheesecake has completely chilled overnight in the fridge. Do not add the whipped mascarpone topping or the cocoa powder just yet. Wrap the whole chilled cake in two very tight layers of plastic wrap and one final layer of protective aluminum foil. Freeze it securely for up to two months. Simply thaw it in the fridge overnight before adding the fresh cream topping right before serving.
Cheesecake Troubleshooting: How to Hide a Cracked Top (We Won’t Tell!)
Did your glorious cheesecake crack down the middle despite your absolute best efforts in the kitchen?
Take a deep breath and immediately relax. The absolute best part about this specific Tiramisu Cheesecake Recipe is that we are going to completely cover the top surface anyway. The fluffy mascarpone whipped cream topping will perfectly hide any unsightly cracks or uneven, sunken spots on the surface. Once you heavily dust that gorgeous layer of dark cocoa powder over the whipped cream, nobody will ever know what lies beneath. Your baking secret is totally safe with me.
Nutrition Information (Per Slice)
Frequently Asked Questions: Burning Questions & Quick Fixes (Your Tiramisu FAQs Answered)
Can I completely skip the hot water bath?
I highly advise against skipping it. The water bath provides the gentle, highly humid, and wonderfully even heat required to perfectly set the heavy mascarpone and cream cheese mixture without rapidly overbaking the outer edges. Without it, your cheesecake will likely curdle, develop deep cracks, and become incredibly dry.
Can I easily make this dessert entirely alcohol-free?
Absolutely. You can easily omit the dark rum entirely from the espresso dip. If you still want that classic bite and flavor profile without the actual alcohol content, try adding just a few drops of rum extract directly to the cooled coffee instead.
Why did my beautiful mascarpone whipped cream separate and look grainy?
Mascarpone is extremely sensitive to over-beating and can turn grainy and separate very quickly. Always keep your heavy cream and mascarpone extremely cold before whipping, and mix just until stiff peaks barely begin to form. Watch it very closely and stop the mixer immediately once the frosting firmly holds its shape.
Tiramisu Cheesecake
AUTHOR: True Taste Buds
The ultimate Italian-meets-New-York dessert mashup combining espresso-soaked ladyfingers, a rich mascarpone and cream cheese filling, and a stabilized whipped topping.
30 MINS
70 MINS
100 MINS
12
Ingredients
- 2 cups graham cracker crumbs
- 3 tablespoons light brown sugar
- 6 tablespoons unsalted butter, melted
- 1 cup strongly brewed espresso, cooled
- 3 tablespoons dark rum
- 24 crisp ladyfinger cookies
- Three (8 ounce) packages cream cheese, room temperature
- One (8 ounce) container mascarpone cheese, room temperature
- 1 cup granulated sugar
- 4 large eggs, lightly beaten
- 1/4 cup sour cream
- 1 tablespoon vanilla bean paste
- 1 cup heavy whipping cream, cold
- One (4 ounce) container mascarpone cheese, cold
- 1/4 cup powdered sugar
- 1 teaspoon vanilla extract
- 2 tablespoons unsweetened cocoa powder, for dusting
Instructions
- Preheat your oven to 325 degrees Fahrenheit. In a medium mixing bowl, combine the graham cracker crumbs, light brown sugar, and melted butter until it resembles wet sand. Line the bottom of a 9-inch springform pan with parchment paper. Pour the crumb mixture into the pan, pressing firmly into the bottom and slightly up the sides to form a border. Bake for 10 minutes until toasted.
- Pour the cooled espresso and dark rum into a wide, shallow bowl. Take one crisp ladyfinger at a time and quickly dip the bottom half into the espresso mixture. Immediately flip it over to lightly coat the other side and pull it out right away (under two seconds total). Arrange the dipped cookies tightly side by side in a single layer on top of the slightly cooled graham cracker crust.
- In a stand mixer fitted with a paddle attachment, beat the room temperature cream cheese on medium speed for about three minutes until completely smooth. Scrape down the bowl, add the room temperature mascarpone and granulated sugar, and blend until velvety. Mix in the sour cream and vanilla bean paste on low speed just until incorporated. With the mixer on the lowest possible speed, slowly pour in the lightly beaten eggs, stopping the second they disappear into the batter.
- Wrap the bottom and sides of the springform pan tightly with heavy duty aluminum foil. Pour the cheese batter directly over the ladyfinger layer and smooth the top. Place the pan inside a large roasting pan and pour about one inch of boiling water into the roasting pan. Carefully transfer to the oven and bake at 325 degrees Fahrenheit for 55 to 65 minutes without opening the oven door.
- Turn off the oven completely, crack the door open about an inch, and let the cheesecake cool inside for a full hour. Remove from the water bath, peel off the foil, and let cool on a wire rack until the bottom is cool to the touch. Wrap loosely with plastic wrap and chill in the refrigerator for a minimum of 8 hours or overnight. Before serving, whip the cold heavy cream, cold mascarpone, powdered sugar, and vanilla extract until it holds its shape. Spread over the cheesecake and finish with a dusting of unsweetened cocoa powder.