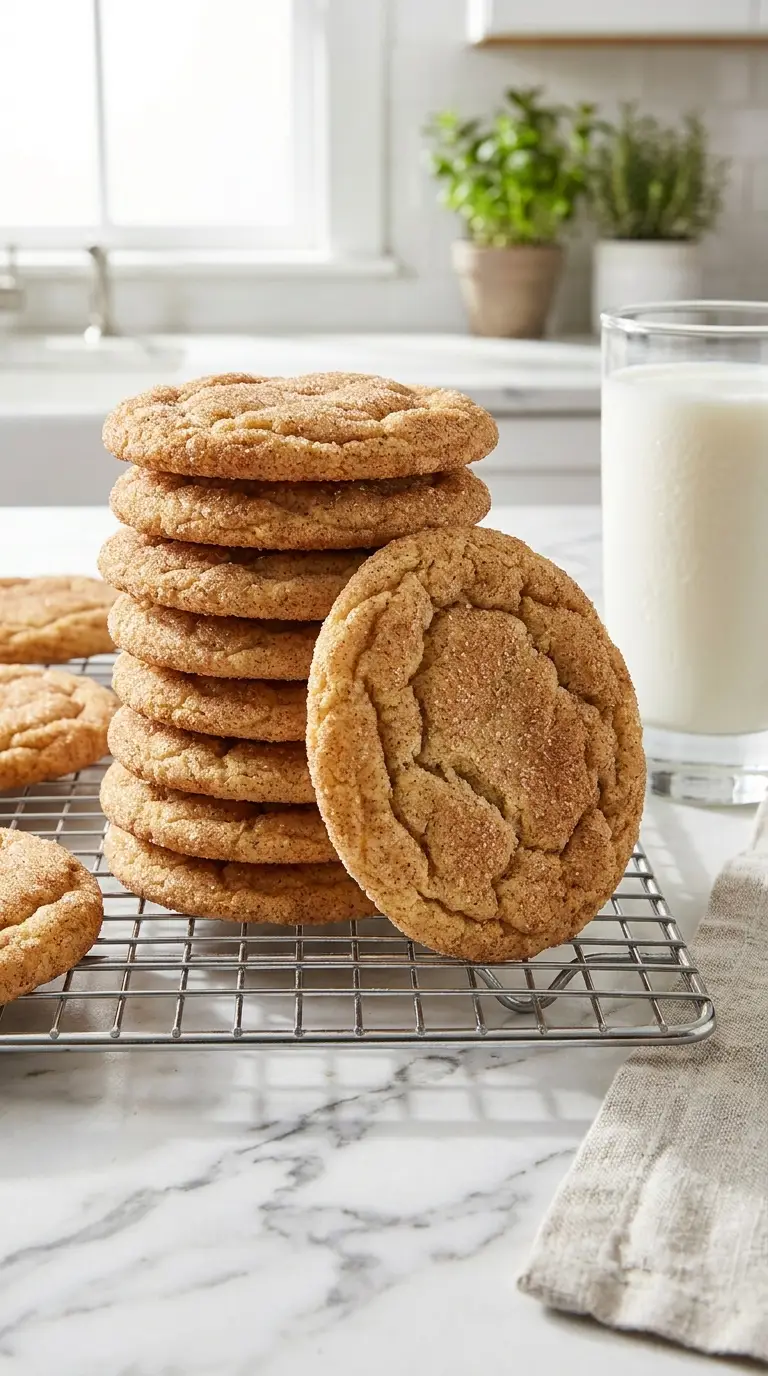
There is something magical about a warm kitchen filled with the scent of cinnamon and sugar.
It takes me straight back to childhood bake sales and snowy winter afternoons with my grandmother. If you are looking for the ultimate Snickerdoodle Cookie Recipe, you have officially landed in the right place. This is the one you will pass down to your kids.
Why You’ll Obsess Over These Pillow-Soft Snickerdoodles
Let me be completely honest with you right now.
Not all cookies are created equal. Some fall flat in the oven, while others turn into dry, crumbly messes the second you bite into them. But these beauties are entirely different. They are thick, incredibly tender, and coated in the absolute perfect ratio of sparkling sugar to warm cinnamon. The magic really happens when the dough puffs up high before settling into those beautiful, signature crinkled tops.
You will find yourself reaching for a second cookie before you have even finished the first.
They literally melt in your mouth.
The History Behind the Classic Cinnamon Sugar Cookie
Have you ever wondered where that quirky, fun name actually comes from?
Food historians love to argue about it constantly. Some claim the word has old German roots, linking it to a traditional pastry called Schneckennudeln. Others believe it was just a completely nonsense word invented by whimsical New England bakers who loved giving silly names to their delicious treats. I personally lean toward the New England theory because baking should be fun.
Whatever the true origin, this classic treat has been a treasured staple in American households since the late 1800s. It famously relies on a touch of cream of tartar to provide that distinct tangy flavor and uniquely chewy texture. Without that specific ingredient, you honestly just have a regular sugar cookie rolled in spice.
The Soft vs. Crispy Debate: Why This Recipe is the Best of Both Worlds
Cookie lovers are usually fiercely divided into two stubborn camps.
You have the soft, underbaked fans on one side. On the other side, you find the crispy edge loyalists who want a serious crunch. I spent three full weeks tweaking this Snickerdoodle Cookie Recipe to satisfy absolutely everyone in my picky family. The edges get wonderfully golden and crisp right on the hot baking sheet. Meanwhile, the centers stay marvelously thick and gloriously soft.
It took dozens of test batches to get the flour ratio exactly right.
The final result is a textural masterpiece that holds up to a tall glass of cold milk perfectly.
No Chill Time Required: The Fastest Route to Cookie Heaven
We have all experienced this exact scenario.
You get a sudden, undeniable craving for a fresh homemade treat at eight o’clock at night. You find a promising recipe, eagerly gather all your baking supplies, and then read the dreaded instructions telling you to chill the dough overnight. That is absolutely not happening here today. I specifically developed this brilliant dough to be mixed, rolled, and baked immediately without spreading into flat puddles.
You can literally go from mixing bowl to warm cookie in under thirty minutes.
The dough is wonderfully sturdy and holds its shape right off the bat. Go ahead and preheat your oven right now.
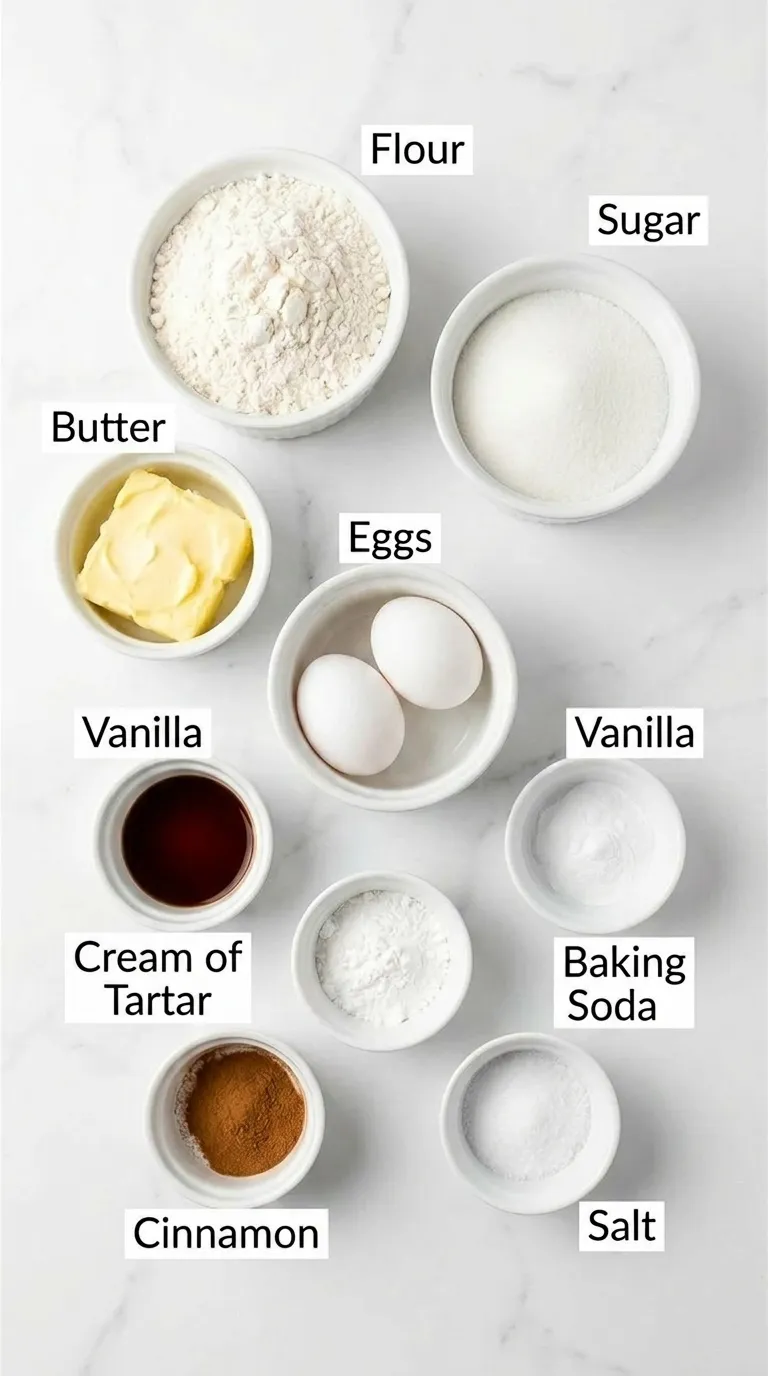
Ingredients
The Great Butter vs. Shortening Showdown: Unlocking the Best Texture
Baking is basically delicious science.
Some old-school recipes call for shortening to keep the cookies thick and prevent them from spreading. I firmly believe butter is the only way to go for maximum flavor. It provides a rich, savory depth that shortening simply cannot match. You just have to make sure your butter is softened to room temperature but not completely melting into a puddle.
The Magic of Cream of Tartar (And Why You Absolutely Can’t Skip It!)
If you look closely at this Snickerdoodle Cookie Recipe, you will notice one very specific powdery ingredient.
Cream of tartar is the undisputed secret weapon here. It acts as a powerful leavening agent when combined with baking soda, ensuring the dough puffs up beautifully in the oven before setting into those trademark crinkles. It also creates that signature tangy flavor that separates a true snickerdoodle from a boring cinnamon sugar cookie. Do not even think about leaving it out.
Choosing the Right Cinnamon for That Perfect Spiced Hug
The sweet and spicy coating is the very first thing you taste.
You want to make sure it absolutely sings on your tastebuds. I highly recommend using a high-quality Saigon cinnamon if you can find it. It has a robust, spicy kick that balances perfectly with the sweet granulated sugar. A cheaper cinnamon will work in a pinch, but the good stuff elevates your bake completely.
What You’ll Need for the Ultimate Chewy Center
Gather everything on your counter before you start mixing.
Equipment
Having the right tools makes whipping up these cookies a total breeze.
Instructions
Step 1: Whisk Together the Dry Ingredients
Grab a medium mixing bowl to get started. This is where the base of your magical dough begins. You want to ensure your flour, cream of tartar, baking soda, and salt are perfectly distributed. Whisk them vigorously until everything is completely aerated. If you do not mix them well right now, you might end up with a clump of baking soda in one single cookie. That is a truly terrible surprise for whoever bites into it.
- Measure the flour using the spoon and level method to avoid packing it down.
- Add the cream of tartar, baking soda, and kosher salt to the bowl.
- Whisk for a full thirty seconds to thoroughly combine and remove any tiny lumps.

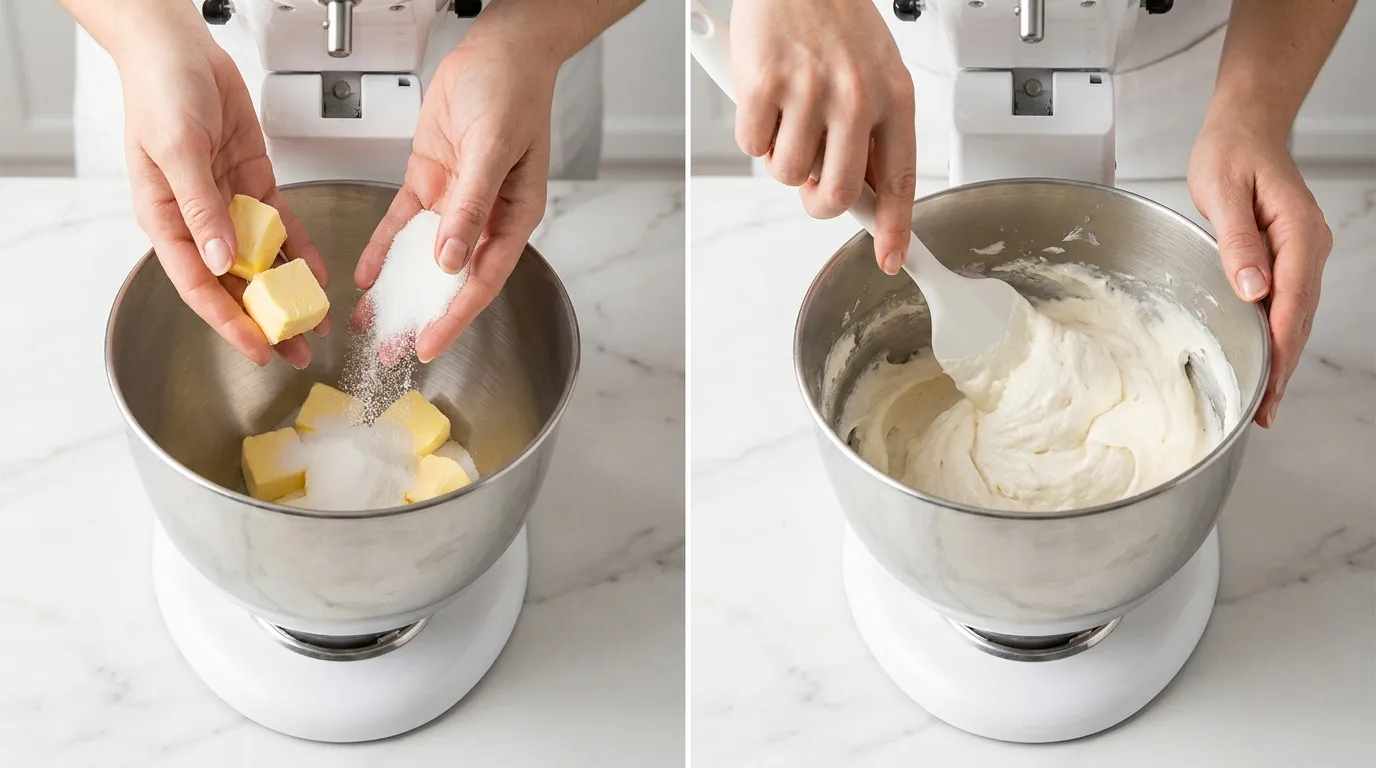
Step 2: Cream the Butter and Sugar to Flawless Fluffiness
Now turn your attention to your stand mixer or a large bowl with a hand mixer. Drop in the room temperature butter and exactly 1 and 1/2 cups of the granulated sugar. You are going to save the remaining 1/4 cup for the cinnamon coating later. Beat them together on medium-high speed for about three full minutes. The mixture should look incredibly pale and fluffy like sweet butter clouds. This crucial aeration process is what guarantees a soft, thick cookie instead of a dense rock.
- Combine the softened butter and 1 and 1/2 cups of sugar.
- Beat on medium-high speed for three minutes until visibly lightened in color.
- Use a rubber spatula to scrape down the sides and bottom of the bowl halfway through.
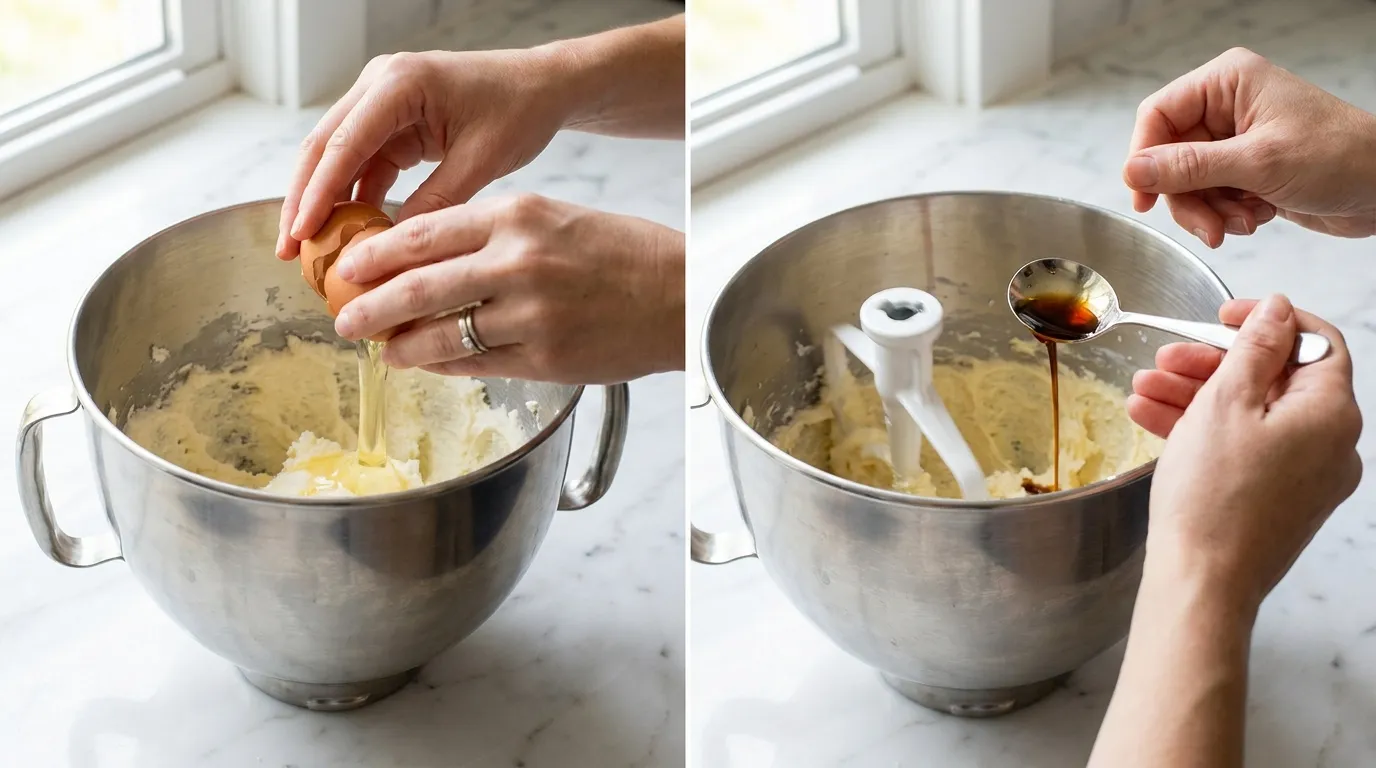
Step 3: Beat in the Eggs and Rich Vanilla Extract
With your mixer running on a much lower speed, add the eggs one by one. Let the first egg fully incorporate into the butter mixture before dropping in the second. This prevents the batter from separating or breaking apart. Next, pour in your pure vanilla extract. You want that lovely aromatic background flavor to round out the sharp bite of the cinnamon. Stop the mixer entirely and scrape all the way down to the bottom of the bowl again.
- Add the first egg and mix until just combined.
- Add the second egg and mix until smooth.
- Pour in the vanilla extract and blend briefly.
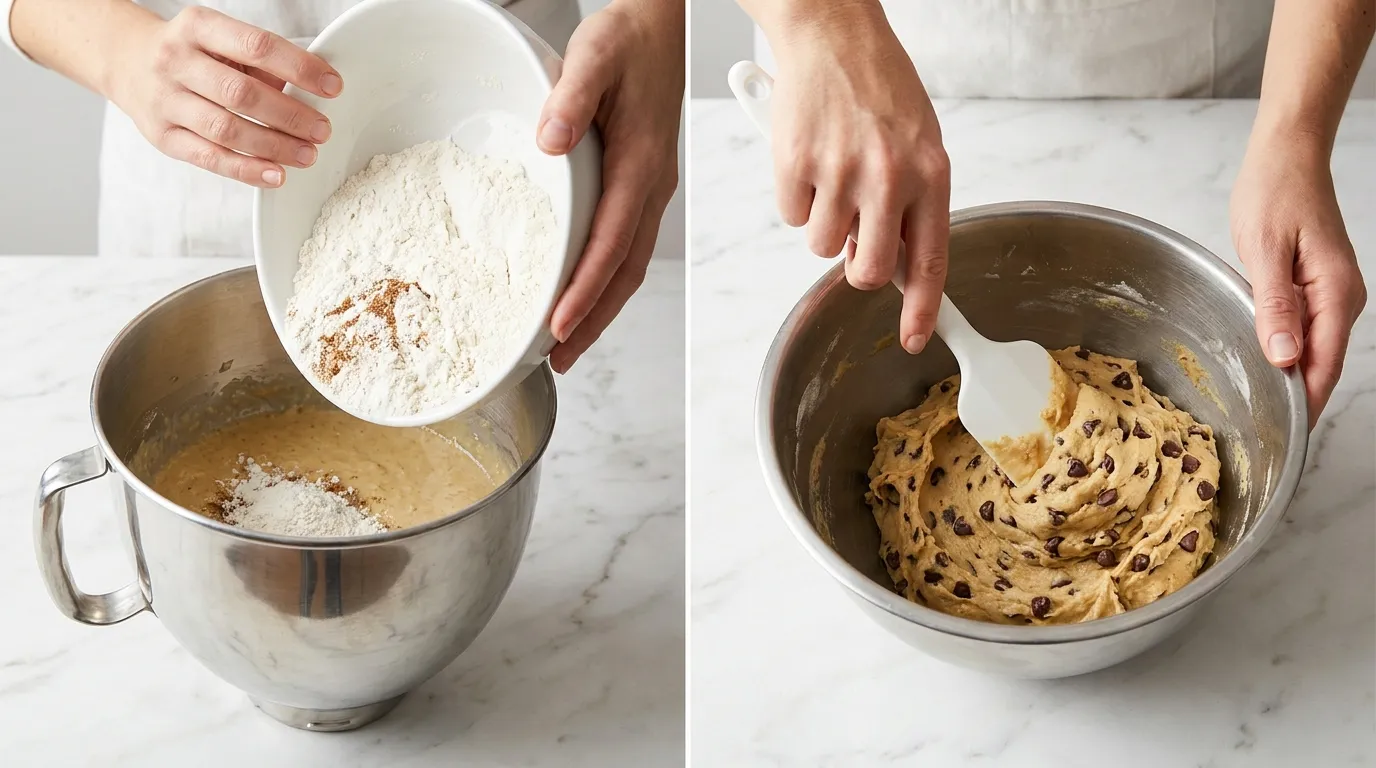
Step 4: Blend the Wet and Dry Mixtures into a Soft Dough
Turn your mixer down to the very lowest setting possible. You definitely do not want a snowstorm of flour covering your kitchen counters. Slowly tap the dry ingredients into the wet mixture in two additions. Let it mix just until you can no longer see any white streaks of flour hiding in the bowl. Overmixing develops the gluten strings and will make your cookies incredibly tough. The final dough will be remarkably thick and wonderfully soft.
- Add half of the dry ingredients and mix on low speed.
- Add the remaining dry ingredients and mix just until incorporated.
- Stop the mixer and fold the last few streaks of flour in by hand.
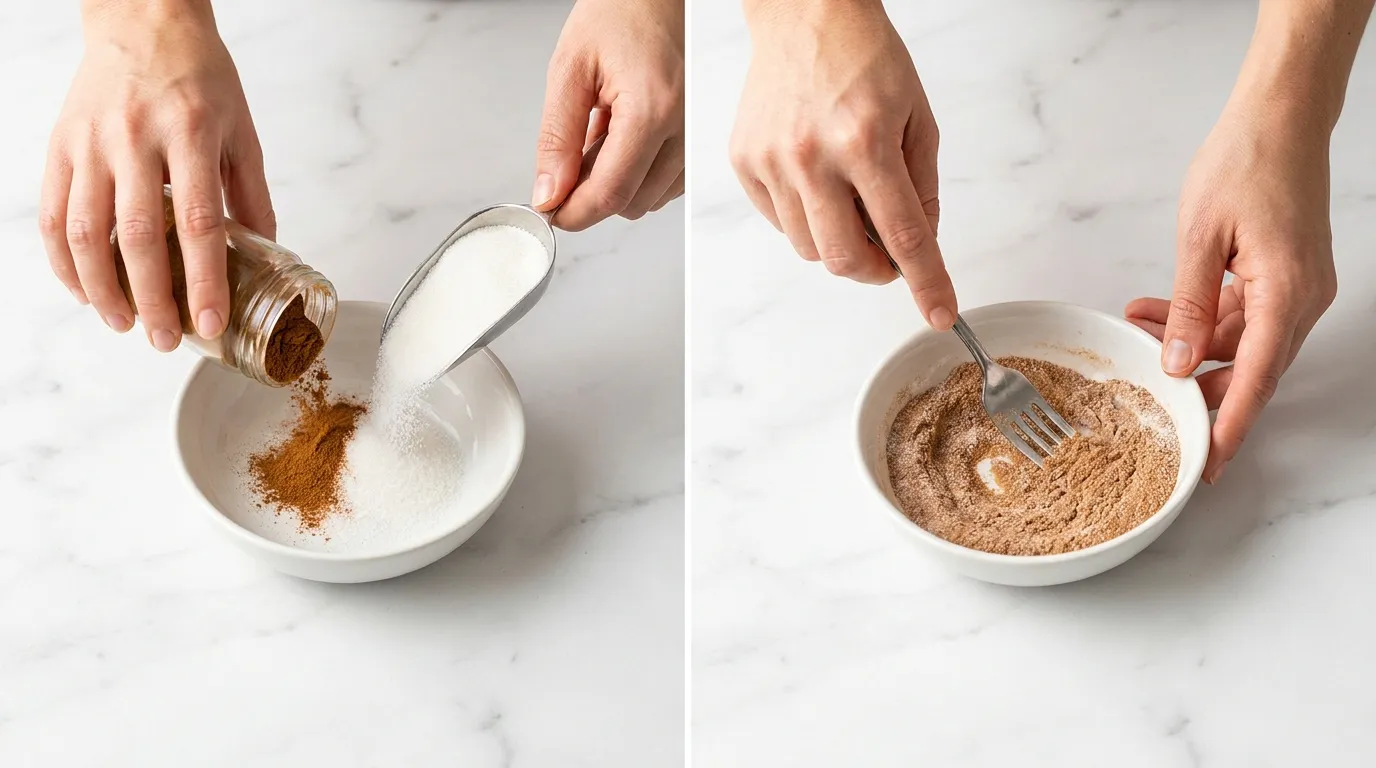
Step 5: Mix the Ultimate Cinnamon-Sugar Coating
Grab a small, shallow bowl for this step. It needs to be wide enough to easily roll balls of dough around in without spilling over the edges. Combine the remaining 1/4 cup of granulated sugar and the ground cinnamon. Use a fork to toss them together until the mixture is completely uniform in color. It should smell like absolute heaven right now. This is the magical coating that gives the snickerdoodle its iconic identity.
- Pour 1/4 cup of granulated sugar into a shallow bowl.
- Add 2 tablespoons of high-quality ground cinnamon.
- Stir briskly with a fork until no white streaks of sugar remain.
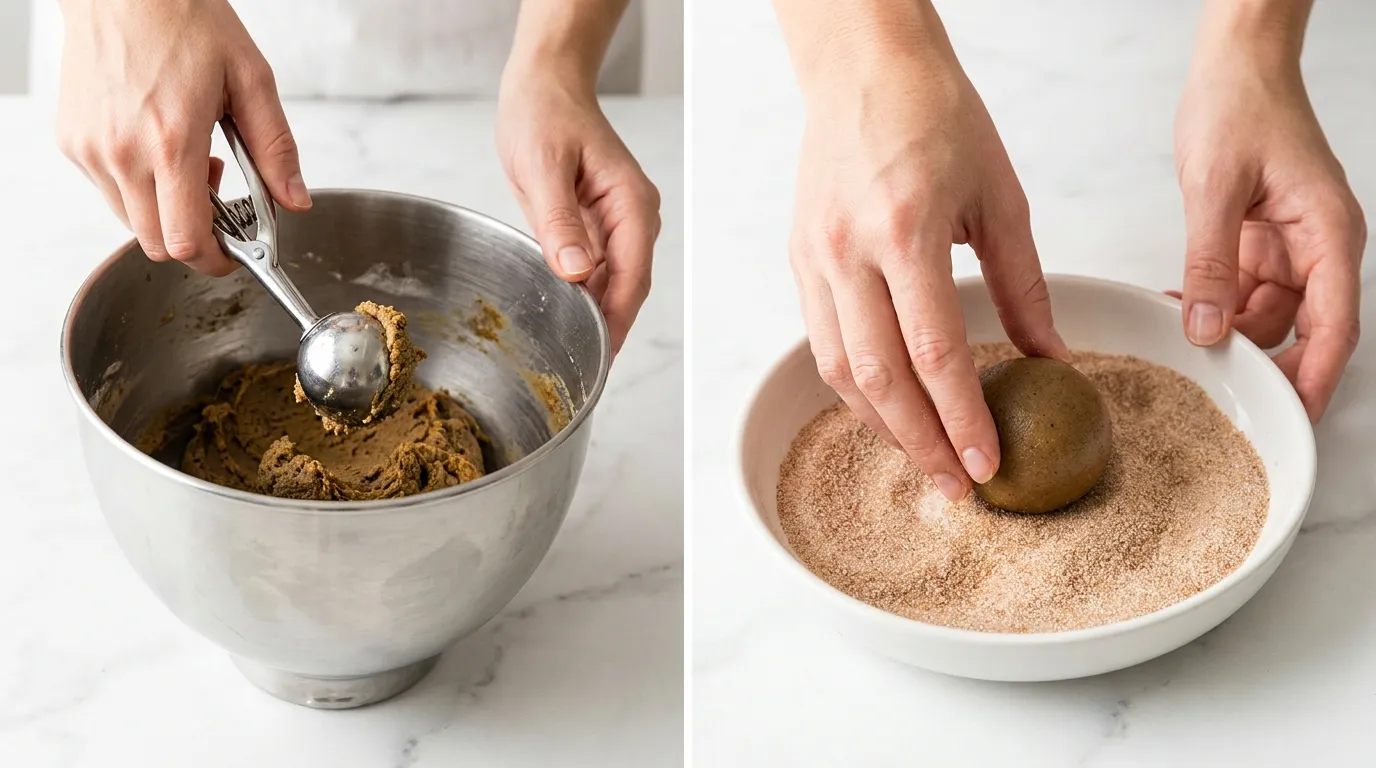
Step 6: Scoop the Dough, Roll into Balls, and Coat Generously
I highly recommend using a medium cookie scoop to portion out your dough. This ensures every single cookie bakes at the exact same rate. Scoop out about two tablespoons of dough and roll it gently between your palms until perfectly smooth. Drop the dough ball right into your waiting cinnamon-sugar mixture. Roll it around until it is completely coated on all sides. Do not be shy here. That thick coating is what creates the iconic crinkly, sparkling crust.
- Scoop two-tablespoon sized portions of dough.
- Roll the dough into smooth balls between your warm hands.
- Toss the balls in the cinnamon sugar mixture until thoroughly coated.
- Space the balls about two inches apart on a parchment-lined baking sheet.
Step 7: Bake Until Puffy with Slightly Crisp Edges
Slide your prepared baking sheets into a preheated 375 degree Fahrenheit oven. Bake them for exactly 10 to 11 minutes. Keep a close eye on them right at the 9-minute mark. The cookies will puff up quite a bit and look extremely soft in the exact center. The edges should look set and just slightly golden brown. Do not be tempted to overbake them. They are going to finish cooking from the residual heat of the hot pan.
- Bake at 375F for 10 to 11 minutes.
- Watch for the edges to set and the centers to remain puffy and pale.
- Remove the baking sheets from the oven immediately.
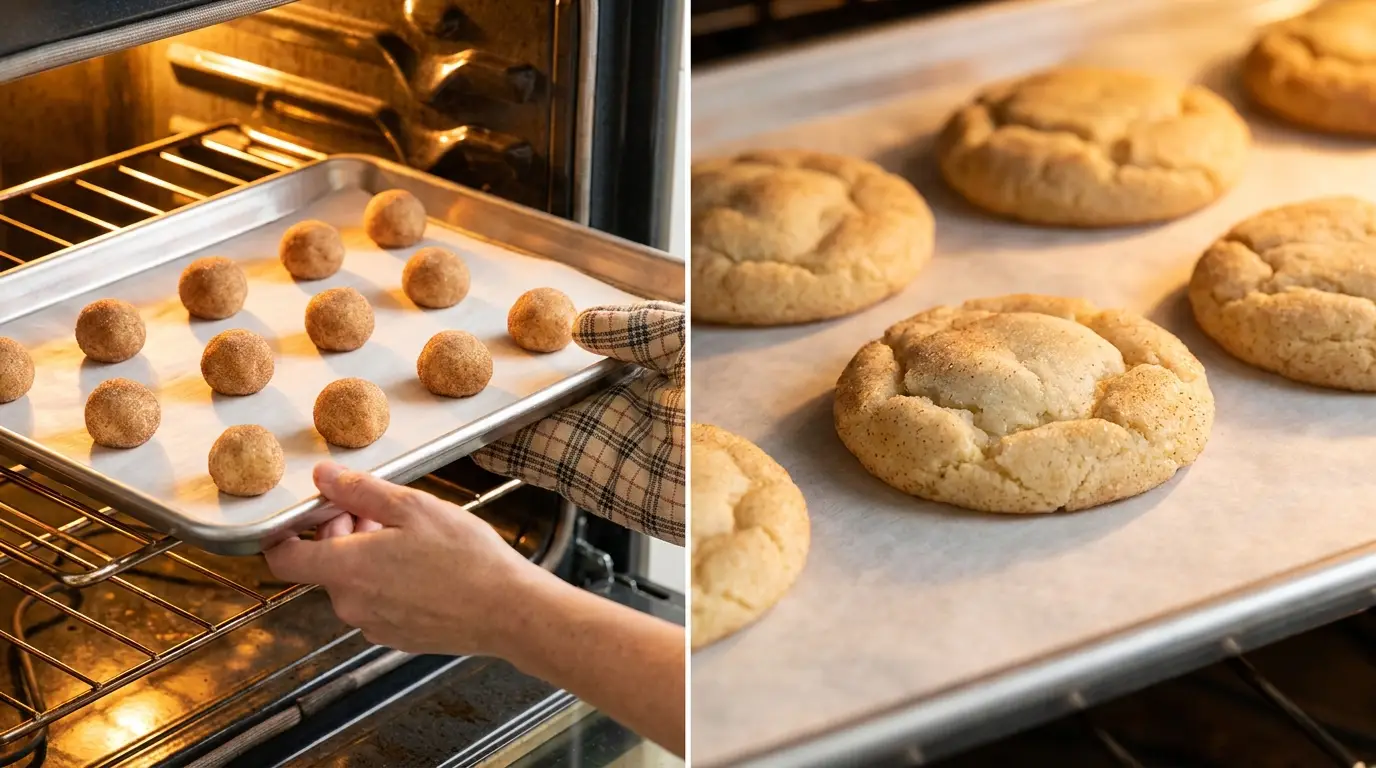
Step 8: Rest on the Baking Sheet to Set the Chewy Center
This is honestly the hardest part of the entire recipe. You have to wait. Let the hot cookies sit untouched on the baking sheet for a full 10 minutes. As they cool down, those puffy centers will gently fall and create those beautiful, trademark crinkles. The residual heat sets the middle perfectly without drying it out into a crisp. Finally, use a thin metal spatula to transfer them to a wire rack to cool completely.
- Leave the cookies on the hot baking sheet for 10 full minutes.
- Watch as they deflate slightly to form crinkly tops.
- Transfer carefully to a wire cooling rack.

Common Snickerdoodle Mistakes to Avoid (Say Goodbye to Flat Cookies!)
Baking is supposed to be relaxing, but a pan full of flat puddles is incredibly frustrating. The most common culprit is butter that is way too warm. If your butter is melted or greasy, the dough will spread uncontrollably in the hot oven. Always use room temperature butter that still holds its shape. Another massive mistake is skipping the cream of tartar. Without it, you will never get that distinctive tang or the chewy, crinkled texture that makes a snickerdoodle authentic. Lastly, do not overmix your dough. Overmixing leads to a tough, bready bite instead of a tender melt-in-your-mouth experience.
Freezing & Storage Secrets for Make-Ahead Baking
You can easily keep these cookies soft and fresh for days. Store baked cookies in an airtight container at room temperature. If you want to keep them incredibly soft, tuck a small slice of sandwich bread into the container. The cookies will absorb the moisture from the bread and stay fresh for up to five days. If you want to freeze the dough, simply roll the balls in the cinnamon sugar and freeze them solid on a baking sheet. Once frozen, transfer them to a zip-top bag. You can bake them straight from frozen by just adding an extra minute or two to your baking time.
Next-Level Flavor Variations: Brown Butter, Chai, and Caramel-Stuffed
Once you master this classic base, you can start having some serious fun. Try browning your butter first and letting it cool before mixing the dough. Brown butter adds a rich, nutty depth that pairs amazingly with cinnamon. If you love warm spices, turn these into Chai Snickerdoodles by adding cardamom, ginger, allspice, and cloves to the sugar coating. For an incredibly decadent twist, flatten a ball of dough, place a soft caramel candy in the center, and roll the dough back into a sealed ball before baking. The gooey caramel center will blow your mind.
Serving Suggestions: The Best Ways to Enjoy Your Snickerdoodles
Eating these warm right off the cooling rack is perfectly acceptable. However, you can easily elevate your dessert game. Try sandwiching a massive scoop of premium vanilla bean ice cream between two large snickerdoodles for the ultimate summer treat. They are also incredibly delicious when crumbled over a bowl of warm oatmeal or Greek yogurt for a slightly sweet breakfast crunch. Of course, the absolute classic way to serve them is alongside a steaming hot mug of coffee or a tall glass of ice-cold milk. Dunking is highly encouraged.
Nutrition Information
Estimated nutritional values per cookie:
Frequently Asked Questions
Why did my cookies spread so much?
This usually happens because the butter was entirely too soft or partially melted before mixing. It can also happen if you placed your dough onto a baking sheet that was still hot from a previous batch. Always bake on cool baking sheets.
Can I substitute the cream of tartar?
Technically, you can use 2 teaspoons of fresh lemon juice or white vinegar as a replacement, but I strongly advise against it. The cream of tartar is essential for the authentic tangy flavor and signature chewy texture.
Do I have to chill the dough?
Not with this specific recipe. This dough was carefully developed to be sturdy enough to bake immediately. However, if your kitchen is extremely hot and the dough feels overly sticky, chilling it for 20 minutes will not hurt at all.
How do I know when they are fully baked?
The secret is taking them out when they look slightly underdone. The edges should be softly set, but the centers should still be puffy and very pale. They will flatten out and finish cooking on the warm pan outside of the oven.

Ultimate Pillow-Soft Snickerdoodles
AUTHOR: True Taste Buds
Thick, incredibly tender snickerdoodle cookies coated in the perfect ratio of sparkling sugar to warm cinnamon. This no-chill recipe features wonderfully crisp edges with soft, chewy centers.
15 MINS
10 MINS
25 MINS
24
Ingredients
- 1 cup unsalted butter, softened
- 1 and 3/4 cups granulated sugar, divided
- 2 large eggs, room temperature
- 2 teaspoons vanilla extract
- 2 and 3/4 cups all-purpose flour
- 2 teaspoons cream of tartar
- 1 teaspoon baking soda
- 1/2 teaspoon kosher salt
- 2 tablespoons ground cinnamon
Instructions
- Grab a medium mixing bowl and whisk together the flour (measured using the spoon and level method), cream of tartar, baking soda, and kosher salt. Whisk for a full thirty seconds to thoroughly combine and remove any tiny lumps.
- In a stand mixer or large bowl with a hand mixer, combine the softened butter and 1 and 1/2 cups of the granulated sugar. Beat on medium-high speed for three minutes until visibly lightened in color and fluffy. Use a rubber spatula to scrape down the sides and bottom of the bowl halfway through.
- With the mixer on low speed, add the eggs one at a time, mixing until just combined after the first, and smooth after the second. Pour in the vanilla extract and blend briefly.
- Turn the mixer down to the lowest setting. Add half of the dry ingredients and mix on low speed, then add the remaining dry ingredients and mix just until incorporated. Stop the mixer and fold the last few streaks of flour in by hand using a rubber spatula.
- In a small, shallow bowl, pour the remaining 1/4 cup of granulated sugar and 2 tablespoons of ground cinnamon. Stir briskly with a fork until no white streaks of sugar remain.
- Use a medium cookie scoop to portion out two-tablespoon sized portions of dough. Roll the dough into smooth balls between your hands, then toss them in the cinnamon-sugar mixture until thoroughly coated. Space the balls about two inches apart on a parchment-lined baking sheet.
- Bake at 375°F for 10 to 11 minutes. Watch for the edges to set and the centers to remain puffy and pale. Remove the baking sheets from the oven immediately.
- Leave the cookies on the hot baking sheet for 10 full minutes to deflate slightly and form crinkly tops. Transfer carefully to a wire cooling rack to cool completely.