
Why This Apple Fritter Loaf Will Completely Ruin Bakery Donuts For You
Let me be perfectly honest with you.
The moment you pull this warm, glaze-drenched loaf out of the oven, your kitchen is going to smell like a bustling autumn carnival. It is intoxicating. Every corner of your house will be filled with the rich aroma of cinnamon and caramelized apples. You might actually find yourself standing by the stove just breathing it in. That is exactly what happened to me last Tuesday when I first tested this Apple Fritter Bread Recipe.
Bakery donuts are great. We all love a good paper bag filled with deep-fried treats. But this homemade bread takes that familiar joy and elevates it into something you can easily slice and share with your family over morning coffee.
Once you taste the crisp sugary crust giving way to a tender, apple-packed crumb, there is no going back.
From Classic Fried Fritter to Sliceable Perfection: The Inspiration
I have always had a massive weak spot for apple fritters. The craggy edges and pockets of spiced fruit get me every single time. My local bakery makes a giant one that is roughly the size of a dinner plate. I wanted to capture that exact magic without the messy hassle of deep frying.
Frying at home can be terrifying and exhausting.
The solution was to transform those classic flavors into a dense, moist cake. I layered fresh chopped apples and a generous cinnamon-sugar swirl right into the batter. As it bakes, those layers melt together to create the gooey fruit pockets that define a true fritter. Then I finish the whole thing off by pouring a simple powdered sugar glaze over the hot crust. The icing seeps into the cracks and solidifies into a crackly shell that shatters beautifully when you cut into it.
No Yeast, No Proofing: Why This Quick-Bread Method is Utterly Foolproof
Baking bread usually implies a full afternoon commitment. You have to wait for dough to rise and hope your yeast is actually alive. I absolutely do not have the patience for that on a busy weekday morning.
This recipe changes all the rules.
Because this is technically a quick bread, we rely on baking powder instead of yeast to get that gorgeous rise. You simply mix your wet ingredients, fold in the dry, and layer it all in a standard loaf pan. You can have the batter ready for the oven in about fifteen minutes flat. It is incredibly forgiving and practically impossible to mess up.
Whether you are an absolute beginner or a seasoned baker, this Apple Fritter Bread Recipe is going to make you look like an absolute culinary genius. Grab your favorite mixing bowl and get ready to fall in love.
Ingredients: What You’ll Need (And A Few Genius Pantry Swaps)

Gathering your ingredients is the first step to executing this Apple Fritter Bread Recipe flawlessly. I always recommend setting everything out on the counter before you start.
Having room temperature ingredients ensures your batter mixes together smoothly without any stubborn lumps. Cold butter or eggs can cause the mixture to break. Take your dairy out of the fridge about an hour before you plan to bake. You will certainly thank yourself later.
The Ultra-Moist Batter Base: Why Sour Cream is Your Secret Weapon
This is where the magic starts. Sour cream is the absolute best ingredient for quick breads.
It adds a rich tang that perfectly balances the sweetness of the fruit. More importantly, the high fat content creates a velvety crumb that stays fresh for days. If you do not have sour cream on hand, plain full-fat Greek yogurt is a fantastic substitute.
The Star of the Show: Picking the Ultimate Sweet-Tart Baking Apples
You cannot have an apple fritter without phenomenal apples.
I strongly prefer Granny Smith apples for this bake. Their signature tartness cuts right through the sugary glaze and brown sugar swirl. They also hold their shape beautifully in the oven. You will get distinct, tender bites of fruit instead of mushy applesauce pockets.
The Crucial Crunch: Brown Sugar & Cinnamon Swirl Elements
This simple mixture is what gives our bread that iconic fritter flavor. When the brown sugar melts into the batter, it caramelizes around the apples. It creates those dark, sticky, cinnamon-laced ribbons that make bakery fritters so irresistible.
The Crowning Glory: That Signature Crackly Vanilla Glaze
A fritter is simply not a fritter without a proper glaze.
We are making a classic powdered sugar icing using the remaining vanilla extract and a splash of milk. This mixture gets poured directly over the warm loaf. As the bread cools, the glaze sets into a delicate crust. It seals in all that incredible moisture and provides a satisfying shatter with every single bite.
Equipment You Will Need
You do not need any fancy gadgets to pull off this masterpiece. A basic hand mixer makes quick work of creaming the butter and sugar, but a sturdy whisk and some elbow grease will also get the job done.
- Standard loaf pan
- Large mixing bowls
- Hand mixer or stand mixer
- Rubber spatula
Let’s Put It Together: Your Roadmap to Spiced, Golden Perfection
Now comes the absolute best part of the entire process.
We are going to take those simple ingredients and transform them into something truly spectacular. The process moves very quickly once you get started. Having your workstation organized makes everything flow like a dream. You will feel just like a professional pastry chef working in a high-end bakery kitchen.
Preheat your oven to 350 degrees Fahrenheit and generously grease your standard loaf pan with butter or non-stick baking spray. Do not skip greasing the corners. Let us dive into making this incredible Apple Fritter Bread Recipe.
Phase 1: Sautéing the Apples into a Syrupy Dream
Taking a few extra minutes to cook your apples first is the ultimate secret to a perfect fritter texture.
Raw apples release water into the batter as they bake. That extra liquid can easily ruin the structure of your loaf and leave you with a soggy mess. By lightly sautéing them beforehand, we evaporate that excess moisture while coaxing out their natural sweetness. It concentrates the flavor into every single bite.
- Place your peeled and chopped Granny Smith apples into a medium skillet over medium-low heat.
- Sprinkle exactly one tablespoon of your brown sugar and cinnamon mixture over the apples.
- Stir the fruit constantly for about five minutes until the apples soften slightly and a thick syrup coats the bottom of the pan.
- Remove the skillet from the heat immediately and let the apples cool down while you prepare the batter.

Phase 2: Whipping Up the Rich, Tender Dough
This is where we build the velvety foundation of our quick bread.
A tender crumb relies entirely on how well you treat your wet ingredients. Creaming the butter and sugar forces tiny air pockets into the mixture. Those pockets expand in the oven to give your loaf a beautiful and delicate lift.
- In a large mixing bowl, beat the softened butter and granulated sugar together on medium speed until the mixture looks fluffy and extremely pale yellow.
- Add the room temperature eggs one at a time, beating well after each addition until fully incorporated.
- Blend in one teaspoon of vanilla extract and the room temperature sour cream until the wet batter is completely smooth.
- In a separate bowl, whisk together your flour, baking powder, and salt.
- Gently fold the dry ingredients into the wet mixture using a rubber spatula just until no white streaks of flour remain.

Phase 3: The Assembly Trick for the Ultimate Cinnamon Ribbon Effect
Layering is the crucial technique that turns a plain cake into an authentic fritter experience.
We are essentially creating distinct strata of dough, spiced apples, and brown sugar. As the bread bakes, the cinnamon sugar melts downward. It creates gooey pockets and gorgeous dark swirls throughout the center of the bread.
- Spread exactly half of your thick batter into the bottom of your prepared loaf pan, smoothing it out evenly into the corners.
- Arrange half of your cooled, syrupy apples evenly across the top of the batter.
- Sprinkle half of the remaining brown sugar and cinnamon mixture directly over the apples.
- Spoon the second half of the batter over the sugar layer, spreading it carefully to cover the filling.
- Top with the rest of the chopped apples and a final heavy dusting of the cinnamon sugar mixture.
- Use a butter knife to gently swirl a figure-eight pattern deep into the pan to marble the layers.

Phase 4: Baking to a Deep, Bakery-Style Golden Brown
Your kitchen is about to smell absolutely phenomenal.
Because this batter is dense and packed with fresh fruit, it requires a significant amount of time in the oven. The slow bake ensures the center cooks completely without burning the delicate sugar crust on top.
- Place the loaf pan onto the center rack of your preheated oven.
- Bake for 55 to 65 minutes.
- Check the bread around the 45-minute mark. If the top is browning too quickly, tent a piece of aluminum foil loosely over the pan for the remainder of the baking time.
- Test for doneness by inserting a long wooden skewer straight into the center of the loaf. It should come out completely clean or with just a few moist crumbs attached.

Phase 5: The Essential Cool-Down and Heavy-Handed Glaze Drizzle
Patience is arguably the hardest ingredient to source for this recipe.
If you pour the glaze over a piping hot loaf, the icing will simply melt into a liquid and disappear. You need the bread to be warm but stable. This allows the powdered sugar glaze to cascade down the sides and harden into that iconic craggy crust.
- Allow the baked bread to cool in the pan for exactly 15 minutes before running a knife around the edges to loosen it.
- Carefully invert the loaf onto a wire cooling rack and let it sit for another 20 minutes.
- Whisk your powdered sugar, milk, and the remaining teaspoon of vanilla extract in a small bowl until completely smooth.
- Generously drizzle or spoon the thick glaze over the top of the warm loaf, letting it drip luxuriously down the sides.
- Let the glaze set for 10 minutes before slicing.

Baking Traps to Avoid: How to Prevent a Raw or Sunken Middle
Quick breads are famous for playing tricks on even the best bakers. The top might look beautifully cracked and deeply browned, but the absolute center could still be a wet puddle of batter. Sinking happens when the bread is pulled from the heat before the structure has fully set.
Always trust your skewer test over the baking time.
Oven temperatures vary wildly between different brands and models. If your skewer comes out wet at 60 minutes, leave it in for another five. That loose foil tent is your best friend here. It protects the cinnamon crust from scorching while the residual heat works its way to the core.
Keep It Fresh: Freezing and Storage Secrets for Long-Lasting Moisture
You will want to protect every last slice of this phenomenal bake.
If you plan to eat the loaf within a few days, keep it in an airtight container at room temperature. The sour cream in the batter naturally locks in moisture so it will easily stay fresh on your counter for up to four days. Do not store it in the refrigerator. The cold air alters the starches and actually dries out the crumb far faster than room temperature storage.
This Apple Fritter Bread Recipe is also a freezer champion. Wrap the completely cooled and glazed loaf tightly in a double layer of plastic wrap followed by a layer of heavy-duty aluminum foil. It will keep beautifully in the freezer for up to three months. Simply thaw it overnight on the counter before serving.
Make It Your Own: Upgrading with Pecans, Walnuts, or a Caramel Twist
Once you master the base recipe, the customization options are practically endless.
If you love a good crunch, fold a half cup of toasted, chopped pecans or walnuts into the cinnamon sugar mixture. The nuts add an earthy depth that pairs spectacularly with the sweet apples. You can also swap out the vanilla glaze for a salted caramel drizzle. Just warm up some store-bought thick caramel sauce and pour it over the top right before slicing for an incredibly decadent autumn dessert.
The Best Ways to Serve (Hint: Try It Warm With Your Morning Coffee!)
There is no wrong way to eat an apple fritter in bread form.
However, my absolute favorite method is warming a thick slice in the microwave for exactly ten seconds. The brief heat softens the apples and turns the glaze slightly tacky. Serve it alongside a steaming mug of dark roast coffee or a spicy chai tea. The bitter notes of the coffee cut perfectly through the rich sweetness of the vanilla icing.
For a true weekend indulgence, toss a slice into a lightly buttered skillet and toast it until the edges crisp up. Serve it with a dollop of fresh whipped cream and you have a breakfast that feels like a holiday.
Nutritional Information (Per Slice)
*Nutrition values are estimates based on a standard 10-slice loaf. Actual values may vary based on specific brands of ingredients used.
Frequently Asked Questions
Can I use a different type of apple instead of Granny Smith?
Yes, absolutely. While Granny Smith apples provide the best tart contrast and hold their shape well, you can successfully use Honeycrisp, Braeburn, or Pink Lady apples. Avoid very soft apples like Macintosh, as they tend to turn into applesauce during the long baking process and make the bread mushy.
Can I make this Apple Fritter Bread Recipe into muffins instead?
You certainly can. This batter adapts beautifully to a muffin tin. Layer the batter, apples, and cinnamon sugar into lined muffin cups just as you would in the loaf pan. Bake at 350 degrees Fahrenheit for 20 to 25 minutes, checking them early with a toothpick. Glaze them exactly the same way once they cool.
Why did my bread turn out dense and heavy?
The most common culprit for a dense loaf is overmixing the batter once the flour is added. You only want to fold the wet and dry ingredients together until the white streaks just barely disappear. Using expired baking powder can also prevent the bread from rising properly. Always double-check your expiration dates before starting.
Can I prepare the batter the night before?
I do not recommend preparing this specific batter in advance. The baking powder begins reacting as soon as it hits the wet sour cream and eggs. If you let it sit overnight, it will lose its leavening power and your loaf will not rise properly in the oven. It is best mixed and baked immediately.
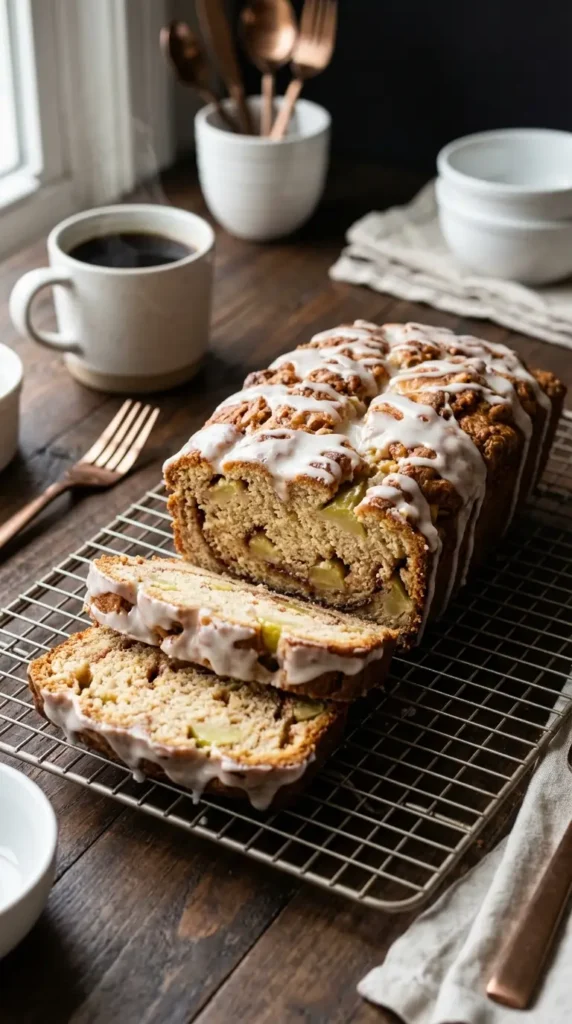
Apple Fritter Loaf
AUTHOR: True Taste Buds
A quick-bread version of a classic bakery apple fritter, featuring tender layers of fresh chopped Granny Smith apples, a gooey cinnamon-brown sugar swirl, and a crackly vanilla glaze.
15 MINS
60 MINS
75 MINS
10
Ingredients
- 1/2 cup Unsalted butter, softened
- 1 cup Granulated sugar
- 2 Large eggs, room temperature
- 2 teaspoons Vanilla extract, divided
- 2 cups All-purpose flour
- 2 teaspoons Baking powder
- 1/2 teaspoon Salt
- 1 cup Sour cream, room temperature
- 2 Medium Granny Smith apples, peeled and chopped
- 1/3 cup Light brown sugar, packed
- 1 tablespoon Ground cinnamon
- 1 cup Powdered sugar
- 2 tablespoons Milk
Instructions
- Place your peeled and chopped Granny Smith apples into a medium skillet over medium-low heat. Sprinkle exactly one tablespoon of your brown sugar and cinnamon mixture over the apples. Stir the fruit constantly for about five minutes until the apples soften slightly and a thick syrup coats the bottom of the pan. Remove the skillet from the heat immediately and let the apples cool down while you prepare the batter.
- In a large mixing bowl, beat the softened butter and granulated sugar together on medium speed until the mixture looks fluffy and extremely pale yellow. Add the room temperature eggs one at a time, beating well after each addition until fully incorporated. Blend in one teaspoon of vanilla extract and the room temperature sour cream until the wet batter is completely smooth. In a separate bowl, whisk together your flour, baking powder, and salt. Gently fold the dry ingredients into the wet mixture using a rubber spatula just until no white streaks of flour remain.
- Spread exactly half of your thick batter into the bottom of your prepared loaf pan, smoothing it out evenly into the corners. Arrange half of your cooled, syrupy apples evenly across the top of the batter. Sprinkle half of the remaining brown sugar and cinnamon mixture directly over the apples. Spoon the second half of the batter over the sugar layer, spreading it carefully to cover the filling. Top with the rest of the chopped apples and a final heavy dusting of the cinnamon sugar mixture. Use a butter knife to gently swirl a figure-eight pattern deep into the pan to marble the layers.
- Place the loaf pan onto the center rack of your preheated oven. Bake for 55 to 65 minutes. Check the bread around the 45-minute mark. If the top is browning too quickly, tent a piece of aluminum foil loosely over the pan for the remainder of the baking time. Test for doneness by inserting a long wooden skewer straight into the center of the loaf. It should come out completely clean or with just a few moist crumbs attached.
- Allow the baked bread to cool in the pan for exactly 15 minutes before running a knife around the edges to loosen it. Carefully invert the loaf onto a wire cooling rack and let it sit for another 20 minutes. Whisk your powdered sugar, milk, and the remaining teaspoon of vanilla extract in a small bowl until completely smooth. Generously drizzle or spoon the thick glaze over the top of the warm loaf, letting it drip luxuriously down the sides. Let the glaze set for 10 minutes before slicing.