
There is a moment of pure magic that happens when a fork glides through tender chocolate sponge and hits a layer of tart cherry filling. You know exactly what I am talking about. Finding the perfect Black Forest Cake Recipe can feel like a lifelong quest for pastry lovers. I spent years trying different versions. Some were too sweet. Others lacked that signature cherry punch. Today I am sharing the one that finally made me stop looking.
Why This Black Forest Cake Will Spoil You for Life
I remember the first time I pulled these chocolate cake layers out of the oven. The whole kitchen smelled like an expensive European bakery.
This is not your average overly sweet bakery dessert. The magic lies in the balance of deep cocoa notes and the bright pop of juicy cherries. You get a delicate crumb that soaks up just the right amount of cherry syrup without turning to mush. Whipped cream blankets the outside to create a light and cloudy contrast to the rich interior.
Once you taste this version, you will never want to settle for anything less.
The Delicious History Behind the Famous Schwarzwälder Kirschtorte
Let us take a quick trip back in time to the beautiful Black Forest region of Germany. This iconic dessert gets its name from a specialty liquor distilled from tart cherries known as Schwarzwälder Kirschwasser. The original creators wanted to showcase this potent cherry spirit in a magnificent way.
They certainly succeeded.
Historically the cake was designed to mimic the traditional attire worn by women in the region. The dark chocolate shavings represent their black dresses. The white cream mirrors their blouses. And those bright red cherries on top? They look exactly like the distinctive red pom-poms on their hats.
It is brilliant and delicious all at once.
Authentic Flavor vs. Boxed Shortcuts: Why Scratch-Made is Always Worth It
We have all been tempted by the convenience of a boxed mix. Life gets busy.
But when it comes to this specific dessert, taking the easy way out usually means sacrificing everything that makes it special. Boxed mixes often use artificial flavorings that leave a strange chemical aftertaste in your mouth. Making your sponge cake from scratch takes just a few extra minutes of measuring flour and cocoa powder.
The reward is a texture that actually deserves to hold up those layers of beautiful fruit and cream.
You can taste the love and effort in every single bite.
Ingredients

What You’ll Need for the Ultimate Decadent Chocolate Sponge
The foundation of this dessert is crucial. You want a crumb that is sturdy enough to hold heavy cream but tender enough to melt in your mouth. High-quality cocoa powder is your best friend here. It brings that deep and dark flavor that perfectly balances the sweetness of the cherries.
I always recommend using buttermilk. It provides a subtle tang and activates the baking soda for a gorgeous rise.
The Secret to the Perfect Kirsch-Infused Cherry Filling
This is where the magic really happens. The filling needs to be tart, sweet, and slightly boozy. We use tart cherries because they offer the most authentic flavor profile. The clear cherry spirit known as Kirschwasser is absolutely non-negotiable for that classic taste.
We will use some of the liquor in the filling and brush the rest directly onto our baked cake layers.
For That Cloud-Like, Stabilized Whipped Cream
Standard whipped cream tends to weep and flatten out after a few hours. That is a disaster for a beautiful layer cake. We are going to stabilize our cream using a tiny bit of unflavored gelatin.
This simple trick ensures your frosting stays fluffy and picture-perfect for days. Make sure your heavy cream is incredibly cold before you start whipping.
The Finishing Touches: Chocolate Curls & Fresh Cherries
People eat with their eyes first. The decoration is what transforms this from a simple chocolate bake into a showstopping centerpiece.
A vegetable peeler makes quick work of creating gorgeous chocolate curls. Top it off with a ring of fresh fruit and you are ready to serve.
Equipment
Having the right tools ready makes the entire baking process smooth and enjoyable. You do not need anything overly fancy to pull this off. A few standard pans and mixing bowls will get the job done beautifully.
- Three (8 inch) round cake pans
- Parchment paper
- Stand mixer or electric hand mixer
- Large mixing bowls
- Vegetable peeler (for chocolate curls)
Instructions
Step 1: Bloom the Cocoa & Mix the Cake Batter
Creating the perfect base for your Black Forest Cake Recipe begins with blooming the cocoa powder. This simply means exposing the dry cocoa to hot water. It releases trapped flavors and creates an intensely deep chocolate profile. You will want to start by preheating your oven to 350 degrees Fahrenheit. Prepare three 8-inch round cake pans by greasing them generously and lining the bottoms with parchment paper.
Whisking the dry ingredients properly guarantees a tender crumb. Bring all your wet ingredients to room temperature before you start mixing. This ensures the batter emulsifies smoothly into a glossy mixture.
- In a large mixing bowl, whisk together the all-purpose flour, granulated sugar, cocoa powder, baking soda, baking powder, and salt until completely blended.
- Add the room temperature eggs, buttermilk, vegetable oil, and vanilla extract to the dry ingredients. Beat on medium speed for about two minutes until the batter is smooth and thick.
- Carefully and slowly pour in the hot water while mixing on the lowest speed. The batter will look incredibly thin like chocolate milk, but do not panic. This is exactly how it should look.

Step 2: Bake the Sponges to Moist Perfection
Evenly baked layers stack beautifully and create a stunning final slice. Uneven layers tend to slide and crack under the weight of the cherries. Take the time to divide your thin batter evenly among the three prepared pans. A kitchen scale works wonders for this exact task to ensure absolute precision.
Watch your oven closely around the thirty minute mark. Overbaking chocolate cake dries it out incredibly fast, and we want these layers to remain remarkably moist.
- Pour the thin batter evenly into the three prepared cake pans. Tap the pans gently on the counter twice to release any large trapped air bubbles.
- Bake in the preheated 350 degree Fahrenheit oven for 30 to 35 minutes. Test the center with a wooden toothpick. It should come out clean or with a few moist crumbs attached.
- Remove the pans from the oven and set them on wire cooling racks.
- Allow the cakes to cool in the pans for exactly 10 minutes before gently running a knife around the edges and turning them out onto the wire racks to cool completely.

Step 3: Simmer the Spiked Cherry Filling and Rich Syrup
While the cakes cool down, it is time to build that iconic cherry interior. This step brings the true soul to our Black Forest Cake Recipe. We are going to thicken the reserved cherry juice into a glossy, ruby-red sauce. This mixture needs to be thick enough to stay between the layers without running down the sides.
The addition of the cherry liquor at the very end preserves its bright flavor.
- Drain the canned cherries through a mesh sieve set over a bowl. Reserve exactly 1/2 cup of the cherry juice. Set the drained cherries aside.
- In a medium saucepan, whisk together the granulated sugar and cornstarch until no lumps remain.
- Pour in the reserved 1/2 cup of cherry juice. Whisk everything constantly over medium heat until the mixture comes to a gentle boil and thickens into a glossy gel. This takes about 3 to 5 minutes.
- Remove the pan from the heat. Gently fold in the drained cherries and 2 tablespoons of the Kirschwasser. Set the mixture aside to cool completely.
- In a small separate bowl, mix the remaining 2 tablespoons of Kirschwasser with 2 tablespoons of plain water or extra cherry juice to create your soaking syrup.

Step 4: Whip the Light-as-Air Vanilla Cream Frosting
Traditional whipped cream deflates easily over time. Stabilized cream holds its shape beautifully for days in the refrigerator. We use a touch of unflavored gelatin to give the heavy cream lasting structure without altering its delightfully fluffy texture.
Temperature is vital here. Everything needs to be freezing cold to achieve maximum volume.
- Place your unflavored gelatin powder into a very small microwave-safe bowl. Add the cold water and stir. Let it sit for 5 minutes to bloom and thicken.
- Microwave the bloomed gelatin for just 5 to 10 seconds until it turns liquid again. Set it aside to cool slightly. Do not let it cool so much that it sets back up.
- In the chilled bowl of a stand mixer fitted with the whisk attachment, pour in the freezing cold heavy whipping cream, powdered sugar, and vanilla extract.
- Whip on medium-high speed until soft peaks begin to form.
- Turn the mixer to low speed and slowly pour in the liquid gelatin in a steady stream. Increase the speed back to medium-high and whip until you reach stiff, glossy peaks.

Step 5: Level the Cakes and Soak Generously with Kirsch Syrup
This is the secret step that guarantees a professional bakery taste and texture. Chocolate sponge acts like a deliciously thirsty sponge. Trimming the rounded domes off your cakes creates a flat surface for sturdy stacking. It also opens up the interior crumb to absorb all that wonderful cherry liquor syrup.
Do not be shy with the soaking syrup. It provides the signature moisture and punchy flavor of a classic Schwarzwälder Kirschtorte.
- Use a large serrated knife to carefully slice off the domed top of each cooled cake layer. Aim for completely flat and even layers.
- Place your first leveled cake layer onto your serving platter or cake stand.
- Using a pastry brush, dab one-third of your reserved Kirschwasser soaking syrup evenly over the entire exposed surface of the cake layer. Pay special attention to the edges.
- Repeat the brushing process on the remaining two cake layers while they sit on the counter.
Step 6: Build the Layers of Cake, Cherries, and Cream
Assembly requires a gentle hand and a bit of patience. Piping a ring of whipped cream around the edge of the cake creates a protective dam. This barrier prevents your beautiful cherry filling from spilling out the sides when you stack the heavy cake layers on top.
Take your time here. Ensure your layers are perfectly aligned so you do not end up with a leaning tower.
- Scoop about 1 cup of the stabilized whipped cream into a piping bag fitted with a large round tip.
- Pipe a thick ring of whipped cream around the top outer edge of your first soaked cake layer on the serving platter.
- Spoon half of your cooled, thickened cherry filling into the center of the whipped cream dam. Spread it out in an even layer.
- Carefully place the second soaked cake layer on top. Press down very gently to secure it.
- Repeat the process. Pipe another whipped cream dam, fill the center with the remaining cherry filling, and top with the final cake layer.

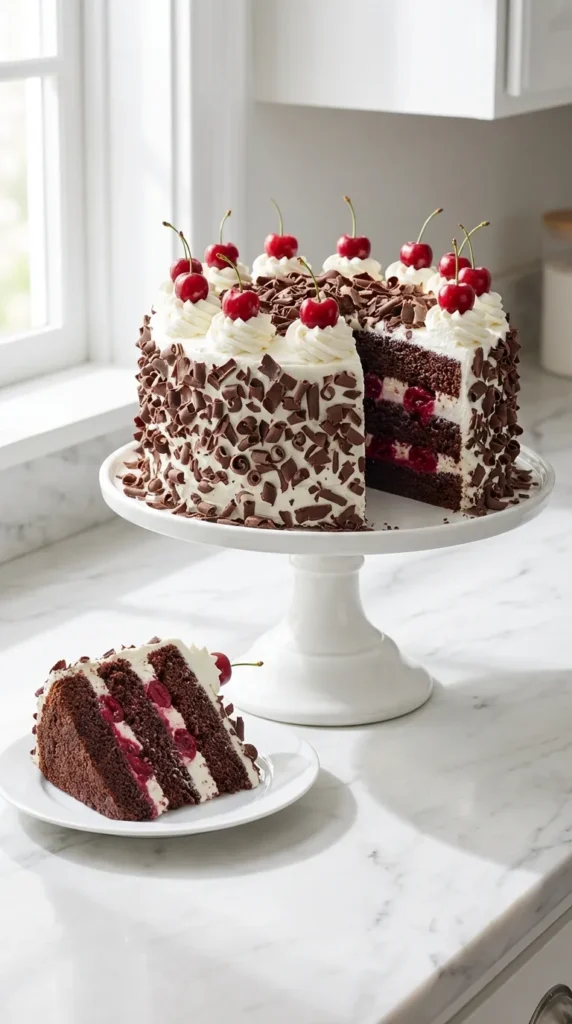
Step 7: Frost, Decorate with Curls, and Chill for the Grand Reveal
Now we dress the cake in its iconic attire. The final layer of cream should look like soft, pillowy clouds against the dark chocolate. The generous chocolate curls and vibrant fresh cherries add that magnificent finishing touch that makes people gasp when you bring it to the table.
Chilling the cake before slicing is mandatory. It allows the cream to set and the flavors to meld together beautifully.
- Scoop a large dollop of the remaining whipped cream onto the top of the cake. Use an offset spatula to spread it smoothly across the top and down the sides of the cake.
- Press your shaved chocolate curls gently into the frosting on the sides of the cake, letting them cascade slightly over the top edges.
- Pipe 12 decorative rosettes of whipped cream evenly around the top border of the cake.
- Place one fresh, sweet cherry with the stem attached firmly onto each piped rosette.
- Sprinkle a few extra chocolate curls right into the center of the cake for a dramatic finish.
- Place the finished cake in the refrigerator to chill for at least 4 hours before slicing.

Pro-Tips for Shaving Bakery-Worthy Chocolate Curls
Creating those beautiful curls is surprisingly easy when the temperature of your chocolate is just right. If your chocolate bar is too cold, it will splinter into tiny shards. If it is too warm, you will end up with muddy smears. Pop your chocolate bar into the microwave for exactly five seconds to soften it slightly. Take a standard vegetable peeler and drag it firmly down the long edge of the bar. The chocolate will roll up onto itself creating gorgeous ribbons. Use a toothpick or a cool fork to transfer the curls to your cake so the heat from your fingers does not melt them.
Kid-Friendly & Alcohol-Free Ingredient Swaps
If you want to serve this to children or simply prefer avoiding alcohol, you can still achieve a wonderful flavor profile. Simply omit the Kirschwasser entirely. Instead of using the cherry liquor for the soaking syrup, use the extra reserved cherry juice from the can. To mimic the complex flavor of the spirit in the filling, add one-half teaspoon of almond extract to the cherry mixture right after you take it off the heat. The almond notes elevate the cherry flavor beautifully without a single drop of alcohol.
Make-Ahead Magic: Freezing & Storage Secrets
This cake actually tastes significantly better on the second day. The sponges need time to fully absorb the cherry syrup and mingle with the cream. You can bake the chocolate cake layers up to a month in advance. Let them cool completely, wrap them tightly in a double layer of plastic wrap, and freeze them. You can even assemble the cake while the layers are partially frozen. Once fully assembled, the cake must be stored in the refrigerator due to the fresh whipped cream. It will stay fresh and delicious in the fridge for up to four days under a cake dome.
Common Cake-Building Mistakes (And How to Avoid Them)
Leaning towers and split layers happen to the best of us. The most common mistake is stacking the layers while the cakes or the cherry filling are still warm. Heat destroys whipped cream instantly. Always exercise patience and ensure every component is cool to the touch. Another common issue is weeping cherry juice that stains the white frosting on the outside of the cake. This happens if you forget to pipe a sturdy whipped cream dam around the border, or if you do not boil the cornstarch mixture long enough to thicken properly. Follow the cooling and thickening steps strictly, and your cake will stand tall and proud.
Nutritional Information (Per Slice)
485
6g
58g
26g
*Nutrition values are estimates based on standard slicing into 12 portions.
Frequently Asked Questions
Can I use cherry pie filling instead of canned tart cherries?
It is not recommended. Canned cherry pie filling is excessively sweet and heavily artificially flavored. It will overpower the delicate balance of the chocolate and cream. Taking a few minutes to thicken canned tart cherries yields a much more authentic and balanced flavor.
Do I absolutely need to use Kirschwasser?
For an authentic, traditional Black Forest Cake Recipe, yes. Kirschwasser provides that unmistakable sharp, clear cherry essence. However, if you cannot find it or prefer to bake without alcohol, you can swap it out for extra cherry juice mixed with a half teaspoon of almond extract.
How far in advance can I make this cake?
You can easily assemble the cake 24 hours before you plan to serve it. In fact, resting overnight in the refrigerator allows the cherry syrup to fully penetrate the chocolate sponge, making the texture incredible. Just keep it covered to prevent the fridge from drying out the whipped cream.
Can I freeze the fully assembled cake?
Freezing the fully assembled cake is not recommended because whipped cream loses its fluffy texture and can separate when thawed. It is best to freeze the un-frosted cake sponges tightly wrapped in plastic, and then make the filling and whipped cream fresh on assembly day.
Ultimate Black Forest Cake
AUTHOR: True Taste Buds
A decadent and authentic German Black Forest Cake featuring moist chocolate sponge layers, tart Kirsch-infused cherry filling, and stabilized vanilla whipped cream.
45 MINS
35 MINS
80 MINS
12
Ingredients
- 1 and 3/4 cups All-purpose flour
- 2 cups Granulated sugar
- 3/4 cup Unsweetened cocoa powder
- 2 teaspoons Baking soda
- 1 teaspoon Baking powder
- 1 teaspoon Salt
- 2 large Eggs, room temperature and beaten
- 1 cup Buttermilk, room temperature
- 1/2 cup Vegetable oil
- 1 teaspoon Vanilla extract
- 1 cup Hot water
- 2 (15 ounce) cans Tart pitted cherries, drained with juice reserved
- 1/2 cup Granulated sugar
- 3 tablespoons Cornstarch
- 1/4 cup Kirschwasser (clear cherry liquor), divided
- 1 teaspoon Unflavored gelatin powder
- 1 tablespoon Cold water
- 3 cups Heavy whipping cream, chilled
- 1/2 cup Powdered sugar
- 1 teaspoon Vanilla extract
- 1 (4 ounce) Semi-sweet chocolate bar
- 12 Fresh sweet cherries, with stems attached
Instructions
- In a large mixing bowl, whisk together the all-purpose flour, granulated sugar, cocoa powder, baking soda, baking powder, and salt until completely blended. Add the room temperature eggs, buttermilk, vegetable oil, and vanilla extract to the dry ingredients. Beat on medium speed for about two minutes until the batter is smooth and thick. Carefully and slowly pour in the hot water while mixing on the lowest speed. The batter will look incredibly thin like chocolate milk, but do not panic. This is exactly how it should look.
- Pour the thin batter evenly into the three prepared cake pans. Tap the pans gently on the counter twice to release any large trapped air bubbles. Bake in the preheated 350 degree Fahrenheit oven for 30 to 35 minutes. Test the center with a wooden toothpick. It should come out clean or with a few moist crumbs attached. Remove the pans from the oven and set them on wire cooling racks. Allow the cakes to cool in the pans for exactly 10 minutes before gently running a knife around the edges and turning them out onto the wire racks to cool completely.
- Drain the canned cherries through a mesh sieve set over a bowl. Reserve exactly 1/2 cup of the cherry juice. Set the drained cherries aside. In a medium saucepan, whisk together the granulated sugar and cornstarch until no lumps remain. Pour in the reserved 1/2 cup of cherry juice. Whisk everything constantly over medium heat until the mixture comes to a gentle boil and thickens into a glossy gel. This takes about 3 to 5 minutes. Remove the pan from the heat. Gently fold in the drained cherries and 2 tablespoons of the Kirschwasser. Set the mixture aside to cool completely. In a small separate bowl, mix the remaining 2 tablespoons of Kirschwasser with 2 tablespoons of plain water or extra cherry juice to create your soaking syrup.
- Place your unflavored gelatin powder into a very small microwave-safe bowl. Add the cold water and stir. Let it sit for 5 minutes to bloom and thicken. Microwave the bloomed gelatin for just 5 to 10 seconds until it turns liquid again. Set it aside to cool slightly. Do not let it cool so much that it sets back up. In the chilled bowl of a stand mixer fitted with the whisk attachment, pour in the freezing cold heavy whipping cream, powdered sugar, and vanilla extract. Whip on medium-high speed until soft peaks begin to form. Turn the mixer to low speed and slowly pour in the liquid gelatin in a steady stream. Increase the speed back to medium-high and whip until you reach stiff, glossy peaks.
- Use a large serrated knife to carefully slice off the domed top of each cooled cake layer. Aim for completely flat and even layers. Place your first leveled cake layer onto your serving platter or cake stand. Using a pastry brush, dab one-third of your reserved Kirschwasser soaking syrup evenly over the entire exposed surface of the cake layer. Pay special attention to the edges. Repeat the brushing process on the remaining two cake layers while they sit on the counter.
- Scoop about 1 cup of the stabilized whipped cream into a piping bag fitted with a large round tip. Pipe a thick ring of whipped cream around the top outer edge of your first soaked cake layer on the serving platter. Spoon half of your cooled, thickened cherry filling into the center of the whipped cream dam. Spread it out in an even layer. Carefully place the second soaked cake layer on top. Press down very gently to secure it. Repeat the process. Pipe another whipped cream dam, fill the center with the remaining cherry filling, and top with the final cake layer.
- Scoop a large dollop of the remaining whipped cream onto the top of the cake. Use an offset spatula to spread it smoothly across the top and down the sides of the cake. Press your shaved chocolate curls gently into the frosting on the sides of the cake, letting them cascade slightly over the top edges. Pipe 12 decorative rosettes of whipped cream evenly around the top border of the cake. Place one fresh, sweet cherry with the stem attached firmly onto each piped rosette. Sprinkle a few extra chocolate curls right into the center of the cake for a dramatic finish. Place the finished cake in the refrigerator to chill for at least 4 hours before slicing.